
Easy and Delicious No-Bake Little Debbie Cake Pop Recipe
No baking required for this easy and delicious Little Debbie cake pop recipe using snack cakes, white chocolate, and sprinkles. Perfect for parties, gifts, or any sweet occasion!

Last week I ran into the grocery store to grab a few things I needed for dinner and happened to walk by the Little Debbie snack section.
Of course, I couldn’t resist taking a quick peek.
There’s something about those nostalgic treats always brings back childhood memories for me.
That’s when I spotted the Little Debbie heart cakes, you know the ones they put out for Valentine’s Day.
That’s when I had an idea…What if I turned these into no-bake cake pops?
I grabbed a box of the strawberry and vanilla heart cakes, came home and got to work in the kitchen.
Now the funny part of this story is that I decided to use the strawberry cakes first.
I mashed the cakes, rolled them into balls and placed them on a baking sheet when our son William came home.
He walked in and said, “What the heck are you making? Is that a ground hamburger for Ellie?”
I could not help but laugh because, honestly, at that stage, they did look a little like pink meatballs!
I reassured William that, no, I wasn’t whipping up some strange new dog treat. Instead, I was experimenting with a fun and easy cake balls recipe.
His reaction did make me second guess my color choice, so I decided to switch things up and use the vanilla heart cakes going forward.
I will say that once I did cover the pink cake balls with chocolate, William did eat one and said that it tasted better than a Starbucks cake pop.
If my 17 year old son thinks that, then it’s a win in my book!
So, if you love a good homemade treat that’s quick, fun to make, and requires no baking, this easy recipe is for you.
Let me show you just how simple they are to make!
What you’ll love about this recipe:

Ingredients for Little Debbie Cake Pops
Grab these simple ingredients to make these deliciously easy no-bake cake pops…

SUPPLIES YOU’LL NEED

*If you make a purchase using one of these links, I may receive a small commission. This does not add any cost to you, but helps me to continue to create & share meaningful content. Thank you for supporting my small business!
How to Make No Bake Cake Pops
Making these sweet treats is incredibly simple and requires just a few easy steps…
RECIPES DELIVERED TO YOUR INBOX
When You Join Our Newsletter
Step One: Prep the Cake Mixture
Unwrap the Little Debbie snack cakes and place them in a large bowl.
Using a rubber spatula, mash the cakes until they form a soft, dough-like consistency.
The frosting inside the cakes helps bind the mixture, so no additional ingredients are needed!


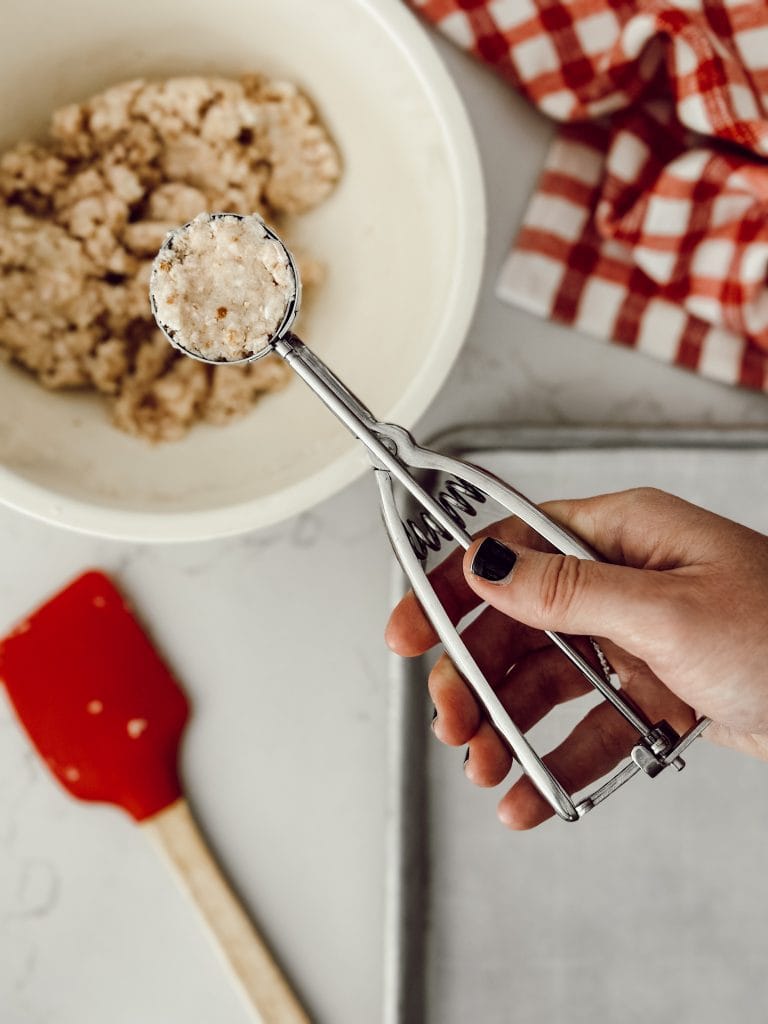
Step Two: Roll Into Balls
With a tablespoon cookie scoop, scoop the cake mixture and roll it into a smooth ball.
Repeat with the remaining cake mixture, placing each ball on a parchment paper lined baking sheet.

Step Three: Insert the Sticks
Melt a small amount of white chocolate in the microwave in 30-second increments, stirring between each until smooth.
Dip the tip of a lollipop stick or straw into the melted chocolate, then insert it halfway into each cake ball.
This helps secure the stick inside the cake pop.
Place the cake pops back in the fridge for about 30 minutes to set.


Step Four: Dip in White Chocolate
Melt the remaining white chocolate in the microwave, stirring until smooth.
Carefully dip each cake pop into the melted chocolate, gently tapping off any excess chocolate.


Note: If your Little Debbie cake balls are too soft when dipping, refrigerate them for 10-15 minutes first. This helps them hold their shape and prevents them from falling off the stick when dipped into the warm chocolate.
Step Five: Decorate and Let Set
Before the white chocolate coating hardens, sprinkle sprinkles on top of the cake balls.
Place the cake pops back onto the parchment lined sheet pan to dry completely.


Step Six: Enjoy!
Once the melted candy coating is fully set, your no-bake Little Debbie cake pops are ready to enjoy!
Store them in an airtight container at room temperature for up to 3 days or in the fridge for up to a week.
Tips & Tricks
- While I used Little Debbie vanilla heart cakes, you can swap them for any frosted Little Debbie snack cake. Try chocolate cakes or zebra cakes for a chocolatey version. If you want to make these for other holidays, pumpkin delights or Little Debbie Christmas tree cakes are great seasonal options.
- Instead of a white chocolate candy melts, you can use milk or dark chocolate. If you want a pop of color, use candy melts in different colors. You can also create your own colored chocolate by adding a few drops of gel food coloring to melted white chocolate. Oh and a chocolate drizzle is another option too.
- Change up the sprinkles! Use pastel sprinkles for Easter, red and green sprinkles for the Christmas season, or rainbow sprinkles for birthdays. If you want some extra texture, add chopped nuts or crushed cookies before the chocolate hardens. How good would that be?!
- If you don’t have treat sticks, don’t worry. You can make cake truffles, which I think are just as delicious.
Can I use a different type of Little Debbie snack cake?
Yes!
Any Little Debbie snack cake will work.
Some great alternatives include chocolate hearts, zebra cakes, oatmeal creme pies, swiss rolls, pumpkin delights, and Christmas tree snack cakes.
The key is to use a cake with a creamy filling, since it helps bind the mixture together.
Why are my cake pops falling off the stick?
If your cake pops are too soft, they may slide off the stick when dipping.
Try chilling them in the fridge for 10-15 minutes before dipping to help them firm up.
Also, make sure to dip the stick in melted chocolate before inserting it into the cake ball.
FAQs: Cake Pops
How do I keep the cake balls from falling apart?
You shouldn’t run into an issue with the cake balls falling apart, however if you do, these tips will help keep your cake balls in their nice round shape…
- Make sure the Little Debbie cakes are fully mashed so the cake and frosting mix together to form dough.
- If the mixture feels too soft, place it in the refrigerator for 10-15 minutes before rolling into balls.
- When rolling, press the cake mixture together firmly to form smooth, solid balls. If they’re too loosely packed, they’ll crumble.
- After shaping, you can chill the cake balls for at least 15 minutes before inserting the stick or dipping them in melted chocolate.
- Before inserting the lollipop stick, dip the tip in melted chocolate, then press it into the cake ball. This acts like glue and helps secure the stick.
Hey friend! What can I help you find?
Search our entire site!
Can you freeze cake pops?
You can freeze cake pops, but for best results, it’s best to freeze them before dipping them in chocolate.
Roll the cake balls and place them on a baking sheet, then freeze them for about an hour until firm.
Once frozen, transfer them to an airtight container or freezer bag and store them for up to two months.
When you’re ready to dip them, let them thaw in the refrigerator before inserting the sticks and coating them in chocolate.
If you’ve already dipped the cake pops, you can still freeze them, but be sure to wrap each one individually in plastic wrap and store them in an airtight container to prevent condensation from affecting the chocolate coating.
Let them come to room temperature before serving.

you might also
Enjoy These No Bake Recipes
Shop My Favorite Products
Shop my favorite home decor & lifestyle products, my LTK sources, and my Amazon Storefront.
By making a purchase with one of my affiliate links, I earn a small commission which helps me continue to create meaningful content for you!
I look forward to sharing more of my home with you and inspiring you to have a well loved home!
Follow me on Facebook, Instagram, Pinterest, and LIKEtoKNOW.it.
xoxo, heidi

Little Debbie No-Bake Cake Pops
Ingredients
- 1 box Little Debbie Vanilla Heart Cakes
- 12 ounces White Candy Melts or white chocolate chips
- Sprinkles
Instructions
- Unwrap the Little Debbie Vanilla snack cakes and place them in a large mixing bowl.
- Use a rubber spatula to mash them until they form a dough-like consistency.
- Scoop about a tablespoon of the mixture using a cookie scoop and roll it into smooth, evenly sized balls. Place them on a parchment lined baking sheet.
- Melt a small amount of white chocolate in the microwave in 30-second increments, stirring between each.
- Dip the tip of a lollipop stick or straw into the melted chocolate, then insert it halfway into each cake ball.
- Place them back in the fridge for about 30 minutes to set.
- Melt the remaining white candy melts (or chocolate chips) in the microwave, stirring until smooth.
- Carefully dip each cake pop into the melted chocolate, gently tapping off any excess.
- While the chocolate is still wet, sprinkle the sprinkles over the top. Place the cake pops back onto the parchment lined cookie sheet to dry completely.
- Once the chocolate is fully set, your no-bake Little Debbie cake pops are ready.
- Store them in an airtight container at room temperature for up to 3 days or in the fridge for up to a week.
Notes
- While I used Little Debbie vanilla heart cakes, you can swap them for any frosted Little Debbie snack cake. Try chocolate hearts or zebra cakes for a chocolatey version. If you want to make these for other holidays, pumpkin delights or christmas tree cakes are great seasonal options.
- Instead of white chocolate, you can use milk or dark chocolate. If you want a pop of color, use candy melts in different colors. You can also create your own colored chocolate by adding a few drops of gel food coloring to melted white chocolate. Oh and a chocolate drizzle is another option too.
- Change up the sprinkles! Use pastel sprinkles for Easter, red and green for Christmas, or rainbow sprinkles for birthdays. If you want some extra texture, add chopped nuts or crushed cookies before the chocolate hardens.
- If you don’t have treat sticks, don’t worry. You can make cake truffles, which I think are just as delicious.
Nutrition
Don’t forget to pin this for later…

shop the post


