
Homemade Christmas Jam Recipe: It’s Cozy & Delicious!
An easy, festive homemade Christmas jam recipe that’s perfect for holiday meals or gift giving featuring cranberries, strawberries, warm spices, and a touch of vanilla.

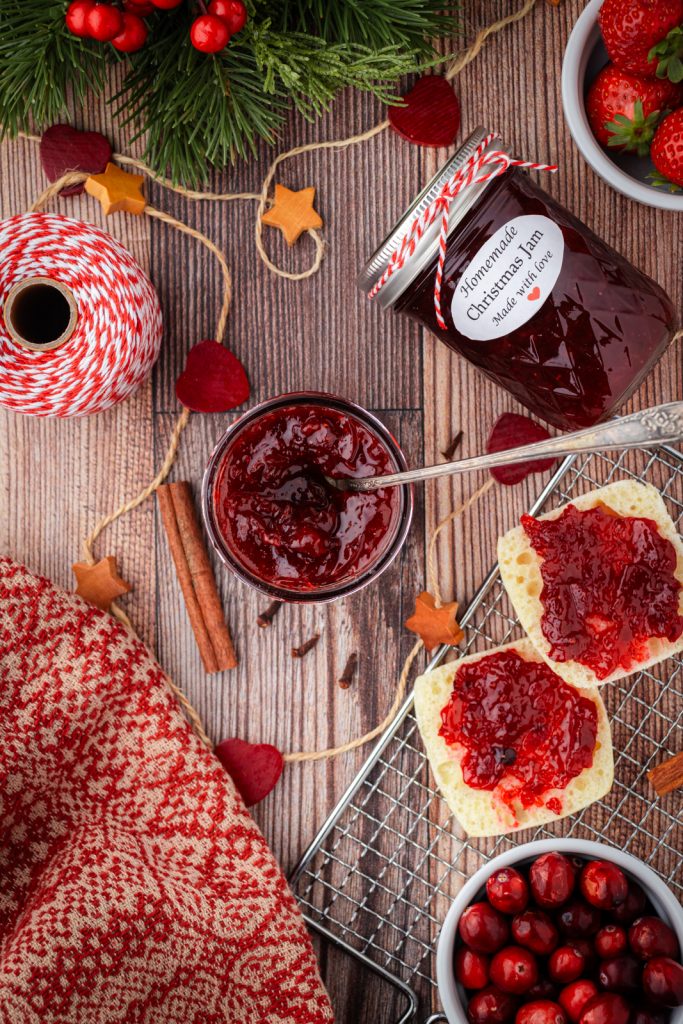
If you could bottle the comfort, coziness, and nostalgia of the holiday season in a jar, it would be with this homemade Christmas jam.
I’m always on the search for coziness when it comes to the holidays whether it’s the glow of candles, the scent of cinnamon in the air, or the warmth of a blanket on a chilly day.
And when it comes to soul warming food, this Christmas jam captures that.
The sweet-tart blend of cranberries and strawberries, spiced with cinnamon and cloves, gives comfort and warmth in every single bite.
It’s the kind of treat that invites you to slow down, savor the moment, and embrace the cozy feeling that makes Christmas so special whether spread on a slice of toast, paired with baked goods, or served on a charcuterie board.
And…this jam isn’t just a treat for your taste buds, it also makes a wonderful gift.
A jar of homemade Christmas jam wrapped with a festive ribbon is the perfect way to share the flavor of the most wonderful time of the year with the ones you love.
So, if you’re looking to add a little extra coziness to your holidays, or just want to surprise someone with a homemade gift, this Christmas jam is perfect.
It’s a simple recipe with big, festive flavor.
Let’s dive into the recipe and bring that cozy, nostalgic holiday feeling into your home too!
What is Christmas jam made of?
Christmas jam is typically made with a combination of fresh cranberries and strawberries.
The jam is flavored with warm, holiday spices like cinnamon, allspice, cloves, and the zest of an orange to add brightness.
It’s thickened with fruit pectin and sweetened with white sugar, resulting in a spreadable, flavorful condiment that’s perfect for homemade gifts or enjoying all on your own during the Christmas season.

What you’ll love about this recipe:
eleanor rose home for the holidays
Christmas Decor, DIY’s, Recipes, & More!
Find everything you need for the most wonderful time of the year.
Strawberry Cranberry Jam Ingredients
Gather these simple ingredients to create a deliciously festive homemade jam bursting with holiday flavors…
TOOLS YOU’LL NEED

*If you make a purchase using one of these links, I may receive a small commission. This does not add any cost to you, but helps me to continue to create & share meaningful content. Thank you for supporting my small business!
Easy Christmas Jam Recipe
Here’s the easy step by step tutorial on how you can create this perfect Christmas jam in your own kitchen…
Step One. Prep the Fruits & Glass Jars
Start by rinsing the cranberries under cold water and setting them aside in a colander to drain. Wash, hull, and halve the strawberries.
Next, prepare your glass jars and lids by washing them in warm, soapy water.
Keep the jars warm by placing them in a stock pot of hot water, which you’ll use later for sealing.
Make sure the pot you’re using is deep enough to submerge the jars by at least an inch.
As you remove the jars to fill them, start boiling the water for the water bath.


Step Two. Prepare the Vanilla Bean
Slice the vanilla bean open lengthwise without cutting through it completely.
Carefully scrape out the seeds with a metal spoon and set them aside.
Note: If you’re using vanilla extract you can skip this step. You’ll add the extract later during the cooking process.

Step Three. Blend the Berries
Using a food processor, pulse the cranberries 10–12 times until they begin to break down.
Transfer them to a large metal pot.
Repeat the process with the strawberries and add them to the pot with the cranberries.

Step Four. Start the Jam
Place the pot with the berry mixture on medium-high heat and bring it to a simmer.
Allow the fruit mixture to cook for about five minutes to soften and blend their flavors.

Step Five. Add the Flavorings
Reduce the heat to medium and stir in the orange zest, cinnamon, allspice, cloves, and vanilla bean seeds (or extract).
Add the fruit pectin, mixing thoroughly to combine all the ingredients.


Step Six. Thicken & Sweeten the Jam
Gradually pour in the three cups of sugar, stirring constantly to dissolve.
Bring the mixture to a full rolling boil, making sure it maintains the boil even when stirred.
Use a thermometer to check that the jam reaches 220 degrees (the ideal temperature for achieving the perfect thickness).
If it hasn’t thickened enough, continue boiling until it coats the back of a spoon.


Step Seven. Fill the Jars
Remove the jam from the heat and skim off any foam from the top.
Carefully ladle the hot jam into the warm jars, leaving about ¼ inch of space at the top of the jar.
Wipe the rims clean with a damp cloth to ensure a good seal, then place the lids and bands on the jars, tightening them fingertip-tight.


What is the white stuff on homemade jam?
The white foam that forms on homemade jam during cooking is a natural byproduct of the fruit’s pectin and air bubbles
trapped in the fruit mixture. It can also contain some impurities and particles released from the fruit as it breaks down. It doesn’t affect the taste, texture, or safety of the jam, it just makes the jam look less appealing.
Step Eight. Water Bath
Submerge the filled jars in the boiling water bath, making sure they’re covered by at least an inch of water.
Cover the pot with a lid and boil for 12 minutes.
This water bath process seals the jars and ensures the jam is preserved properly.
Step Nine. Cool & Check Seals
Using tongs or a jar lifter, carefully remove the hot jars from the pot and set them on a towel to cool for 12 hours at room temperature.
After an hour, check the seals by pressing the center of each lid. If the lid pops up, the seal didn’t form correctly. You’ll need to refrigerate those jars and use them within a week.
Sealed jars of jam can be stored in a cool, dry place for up to 12 months.

Tips & Tricks
- Use fresh, ripe strawberries and cranberries for the best flavor.
- Zest only the bright orange part of the peel, avoid the bitter white pith beneath.
- If using vanilla extract instead of a vanilla bean, add it after removing the jam from the heat to preserve its full flavor.
- Make sure your mixture comes to a full boil and maintains it for the pectin to activate and thicken the jam.
- To test if your batch of jam is ready, place a small dollop on a chilled plate. If it thickens and wrinkles when pushed with your finger it’s done.
- Removing the foam from the top of the jam improves its texture and appearance.
- Warm jars in hot water before filling them to prevent cracking. The water bath should cover the jars by at least an inch for proper sealing.
- After cooling, ensure lids are sealed by pressing the center. A sealed lid won’t pop back up when pressed.
How long does Christmas jam last?
When properly sealed and stored, homemade Christmas jam can last up to 1 year if kept in a cool, dark place.
The key is to make sure the jars are properly sealed during the water bath canning process.
Once opened, the jam should be refrigerated and used within a couple of weeks for the best quality and flavor.
If you have any jars that didn’t seal properly (you can tell if the lid pops up when pressed), store those in the refrigerator and use within 7 days.

Download Our Free Cozy Magazine
Can I use frozen fruit instead of fresh in this jam recipe?
Yes, you can use frozen strawberries and/or cranberries.
However, you want to make sure to defrost the fruit fully before using.
You may need to allow for additional time when cooking the jam since there is extra water in frozen fruit, and it may not solidify as quickly as fresh fruit.
FAQ’s: Christmas Jam Recipe
My homemade jam is too thick, is there something I can do?
You can add a little water to the jam until you reach the consistency you are looking for. You could also add orange juice from the orange you zested if you’d like to add some additional orange flavor.
Do I need to buy any special equipment to make the jam?
No, as long as you have a deep enough pot that covers the jars by at least one inch and a good set of tongs. I do recommended using a metal pot for heating the jam since it’s the best conductor of heat and the berries will not stain the metal.
Is it easy to double this Christmas jam recipe?
Absolutely! This recipe would double very easily if you are looking to make more than four half-pint jars.
What is the best way to enjoy Christmas jam?
Christmas jam is incredibly versatile and can be used a variety of ways.

These are just a few ways to incorporate Christmas jam into your holiday meals and treats…
- Thumbprint Cookies: Spread a dollop of Christmas jam in the center of thumbprint cookies. The sweet and tart jam is perfect with the buttery cookie base.
- Charcuterie Board: Add a jar of Christmas jam to your charcuterie board as a sweet contrast to salty meats and cheeses.
- Leftover Turkey Sandwiches: Spread some Christmas jam on a leftover turkey sandwich in place of cranberry sauce…absolutely delicious!
- Toast or Scones: For a cozy breakfast or snack, spread Christmas jam over a warm slice of buttered toast or a freshly baked scone.
- Yogurt Parfaits: Swirl Christmas jam into yogurt for a quick breakfast or snack.
- Pancakes or Waffles: Use Christmas jam as a topping for pancakes or waffles.
- Cheese Pairings: As part of a cheese platter, pair Christmas jam with strong cheeses like sharp cheddar or blue cheese.
- Roasted Meats: Use the jam as a glaze for roasted meats like ham, pork, or chicken.
Hey friend! What can I help you find?
Search our entire site!
What do you give with jam for Christmas?
This delicious jam makes the perfect gift on its own, but pairing it with a few thoughtful extras can make it even more special.
Here are some ideas for what to give with your homemade jam…
- Fresh Bread or Biscuits: A loaf of homemade bread, a basket of scones, or a batch of flaky biscuits pairs wonderfully with jam.
- Cheese: Jam pairs beautifully with cheeses, especially soft cheeses like cream cheese, goat cheese, or brie. You could even add a cheese board for a great hostess gift.
- Toast Tongs or Jam Spoon: A charming wooden spoon or a set of toast tongs adds a practical touch to the gift.
- Tea or Coffee: Include a package of your favorite tea or a bag of gourmet coffee to complement the jam for cozy mornings.
- Dish Towels: Add a touch of charm by including a seasonal dish towel with your jar of jam.

you might also enjoy
These Cozy Christmas Recipes
Shop My Favorite Products
Shop my favorite home decor & lifestyle products, my LTK sources, and my Amazon Storefront.
By making a purchase with one of my affiliate links, I earn a small commission which helps me continue to create meaningful content for you!
I look forward to sharing more of my home with you and inspiring you to have a well loved home!
Follow me on Facebook, Instagram, Pinterest, and LIKEtoKNOW.it.
xoxo, heidi

Spiced Christmas Jam
Ingredients
- 12 ounces Fresh Cranberries
- 6 cups Fresh Strawberries
- 1 Orange zested
- 1 tsp Ground Cinnamon
- ½ tsp Ground All Spice
- ½ tsp Ground Cloves
- 1 Fresh Vanilla Bean or 1 tsp Vanilla Extract
- 4 tbsp Fruit Pectin
- 3 cups Granulated Sugar
Instructions
- Rinse cranberries under cold water and set aside in colander to drain. Wash strawberries, remove stems, cut in half, and set aside.
- Wash jars and lids in warm soapy water. Set lids and bands aside.
- Place jars only in large pot with hot water until ready to use. Note: You will use this pot to water seal the jars so ensure that the pot is deep enough to cover the jars by one inch. When you remove the jars to fill them, begin boiling the water for the water bath.
- Remove seeds from vanilla bean by slicing open lengthwise but do not cut through to the other side. Open vanilla bean and use a metal spoon to scrap out the seeds. Set aside.
- In a food processor pulse cranberries 10-12 times until berries begin to break down. Place cranberries in a large pot. Add strawberries to the food processor and pulse 10-12 times until berries are broken down.
- Add strawberries to the pot with cranberries and begin heating over medium high heat on the stove until simmering. Simmer for five minutes.
- Lower heat to medium and add the spices, orange zest, vanilla bean seeds (or vanilla extra), and pectin. Stir until mixed. Slowly pour in sugar and bring jam to a rolling boil, stirring frequently, until jam reaches approximately 220°F using an instant read thermometer and continues to boil even when stirred. The jam should be a thick consistency at this point that covers the back of a wooden spoon. If it is not thick, continue boiling until desired consistency is reached.
- Remove jam from heat and remove any foam from the top of the jam using a small spoon. Ladle jam into hot jars leaving ¼ inch space at the top of each jar. Wipe the edges of the top of the jar with a wet towel or paper towel to remove any jam residue along the edges.
- Place lids and bands on jars and tighten fingertip tight only.
- To the large pot of boiling water add the filled jars. Cover with lid and boil for 12 minutes.
- Carefully remove jars from boiling water using tongs and place on a towel on the counter and allow to sit undisturbed for 12 hours. Check jars after sitting for one hour by pressing the center of lid. If the jar did not seal you will be able to press down on the center and feel it pop back up when pressed. If this happens this jar should be stored in the refrigerator and consumed within 7 days. Fully sealed, unopened jam jars can be stored in a cool, dry place for up to twelve months.
Notes
- Use fresh, ripe strawberries and cranberries for the best flavor.
- Zest only the bright orange part of the peel, avoid the bitter white pith beneath.
- If using vanilla extract instead of a vanilla bean, add it after removing the jam from the heat to preserve its full flavor.
- Make sure your mixture comes to a full boil and maintains it for the pectin to activate and thicken the jam.
- To test if your batch of jam is ready, place a small dollop on a chilled plate. If it thickens and wrinkles when pushed with your finger it’s done.
- Removing the foam from the top of the jam improves its texture and appearance.
- Warm jars in hot water before filling them to prevent cracking. The water bath should cover the jars by at least an inch for proper sealing.
- After cooling, ensure lids are sealed by pressing the center. A sealed lid won’t pop back up when pressed.
Nutrition
Don’t forget to pin this for later…

shop the post


Hi Denise, I use powdered pectin for this Christmas jam recipe. Powdered and liquid pectin are not the same, so I would only use powdered in this recipe. I hope that helps and that you love the jam!
Lovely recipe that I’m excited to make today! I’m sorry if this is already mentioned in your post, but I’m unclear on whether to use liquid or powdered pectin. Does it matter with your recipe/process? Thank you!
That sounds like so much fun Colleen!
These are the perfect holiday gift! I am having a friend over this week and we are going to make up a couple batches to have on hand for Christmas gatherings and to give to friends and family!
Thank you Kim!
This sounds and looks delish, Heidi! Perfect for the holiday and ideal for gift giving. Sharing this week in my Mitten Moments! Yum!