
DIY Stamped Easter Napkins for Your Easter Table
A step-by-step tutorial on how to create personalized Easter table decor with these DIY stamped Easter napkins using white napkins, a bunny stamp, and brown ink.

Easter is just a few weeks away, and I’m in full on craft mode, trying to bring all the Easter ideas that have been swirling in my head to life!
It seems like every season brings a flood of inspiration, and with Easter around the corner, there’s no shortage of projects I want to share.
I stumbled upon an Easter napkin idea on Pinterest that inspired me to make my own, and let me tell you…I’m absolutely in love with how they turned out.
If you’re looking for a simple yet stylish way to elevate your table for Easter brunch, lunch, or dinner, this is the craft you need to try!
These DIY stamped bunny napkins are the perfect way to add a charming touch to your table.
They’re quick, easy to make, and look like something you’d find in a high-end boutique but without the expensive price tag.
With just a few affordable items and a little bit of time, you can create beautiful napkins that will make a huge impact on your Easter table.
Whether you’re hosting an elaborate Easter feast or a cozy family dinner (like our family prefers), this DIY craft is a great way to bring a little extra charm to your Easter celebration.
Why you’ll love this DIY
What You’ll Need to Make DIY Stamped Bunny Napkins
Before you start crafting, gather these simple supplies to create your own DIY Easter napkins…

SUPPLIES YOU’LL NEED

*If you make a purchase using one of these links, I may receive a small commission. This does not add any cost to you, but helps me to continue to create & share meaningful content. Thank you for supporting my small business!

WELCOME TO MY COZY CORNER OF THE INTERNET
I’m Heidi, the heart and hands behind Eleanor Rose Home.
I’ll show you that your home can become a place of warmth, comfort, and style with practical tips, creative ideas, and my own journey to help you create a space that feels like you…welcoming, personal, and full of charm.
How to Make Easy DIY Easter Napkins With a Rubber Stamp
Follow these simple steps to create your own charming DIY napkins using a rubber stamp and an ink pad…
SIMPLE COZY LIVING
Want more inspiration to make your home feel cozy and inviting?
Check out our collection of home decor ideas for creative tips and stylish touches you’ll love!
Step One: Choose Your Napkins
The first step is deciding on the plain napkin that you want to add your stamp too.
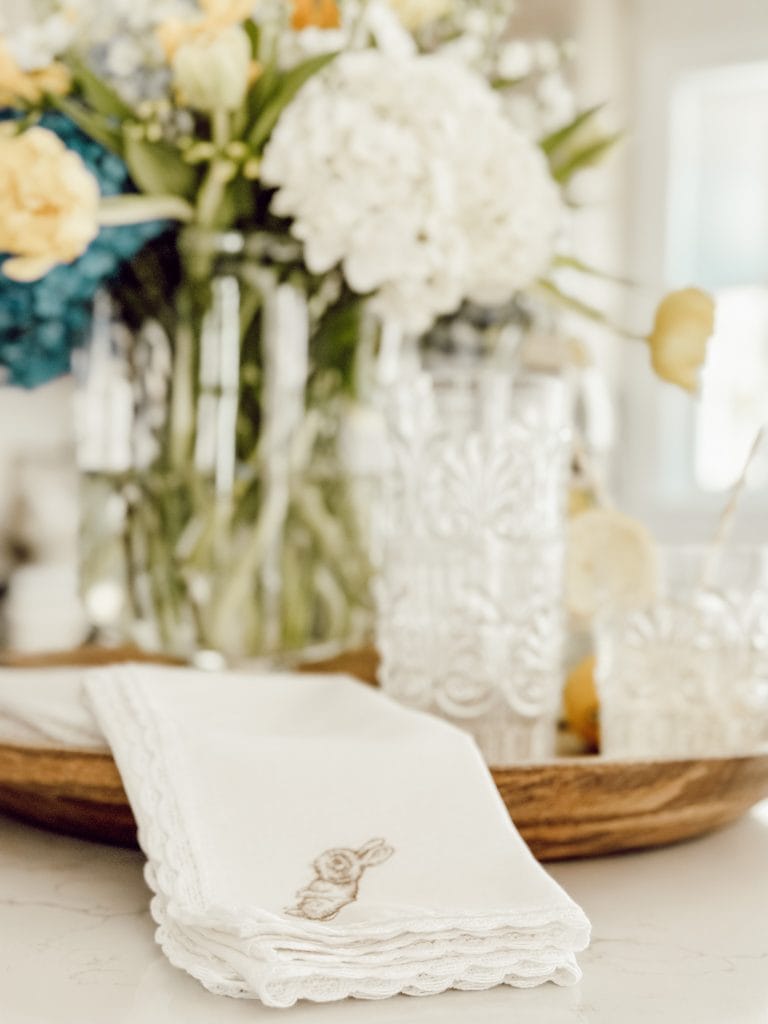
For our home, I used white cotton/linen blend napkins with lace edge detail.
I chose this napkin because I loved the lace detail that gives it more of a vintage feel.
You’ll want to find an inexpensive cotton, linen, or cotton/linen blend napkin you love, and use that for your project.
The most important part of choosing a napkin is that it’s made of natural fibers to ensure the ink will adhere.

Step Two: Iron Napkins
Next, iron the napkins on the highest heat setting (with steam), removing all the creases and wrinkles.
Make sure to do this so that your stamp comes out neat and clean, and isn’t smudged or placed on a part of the napkin that is wrinkly.

Step Three: Stamp Each Napkin
Now for the fun part, stamping!
Gently press your bunny stamp into the brown ink pad, making sure it’s evenly coated but not too saturated.
Position the stamp where you’d like it on your napkin (I love placing mine near one corner).
Press down firmly, ensuring the design transfers clearly onto the fabric.


pro Tip
- To make sure that I was going to be using the right amount of ink on my stamp with the right amount of pressure, I took a scrap piece of paper and on a clean, flat surface practiced stamping the stamp. This way when I went to stamp my napkins, I knew how much ink I needed and how hard to press down on the stamp.
Step Four: Allow Ink to Dry & Iron to Set
Allow the ink on each napkin to fully dry (about 10-20 minutes).
Then with a warm iron, on the backside of the napkin, iron over the stamp to seal and set it.
Do not use steam when ironing over the stamp as this could cause the ink to run or spread on the napkin.
Once you seal the stamp on the napkin, they should be safe for using and washing!

Tips
- Make sure you’re stamping on a flat, hard surface to get a clean, even impression.
- Before stamping directly onto your napkin, test it on a scrap piece of fabric or paper to make sure the ink is transferring well and the stamp is aligned.
- Dab the stamp lightly onto the ink pad rather than pressing it in too hard. You want enough ink for a clear image, but not too much that it bleeds or smears.
- Gently press the stamp down rather than applying too much pressure. This helps avoid smudging and ensures the design stays crisp.
- Allow the stamped design to dry for a few minutes before handling or ironing so that the ink sets and doesn’t smudge.
- When setting the ink with an iron, make sure the napkin is on the reverse side to prevent direct contact with the ink.

Is it safe to wash these stamped Easter napkins?
Yes, it is safe to wash your DIY napkins, but there are a few things you should keep in mind.
First, make sure to use permanent, waterproof ink so that the design stays intact during washing.
I find it’s best to hand wash these napkins or use a gentle machine cycle with cold water to avoid fading of the ink.
Use a mild detergent and avoid bleach or fabric softeners, as these can affect the stamped design as well.
After washing, air dry your napkins, or if you prefer to use a dryer, set it to a low heat setting.
Ironing on the reverse side will help smooth out the fabric and keep the design looking new and fresh.
Hey friend! What can I help you find?
Search our entire site!
Can I use a different stamp?
Absolutely!
Feel free to choose any stamp that suits your style.
Floral designs, birds, or even a custom monogram can make your napkins unique to your home.
other places to find us
What type of napkins work best for this project?
Cotton or linen napkins are ideal because they hold the ink well, and provide a smooth surface for stamping.
Avoid using napkins that are too textured or flimsy since they may not show the design clearly.
you might also enjoy
These Easter DIY Projects


Shop My Favorite Products
Shop my favorite home decor & lifestyle products, my LTK sources, and my Amazon Storefront.
By making a purchase with one of my affiliate links, I earn a small commission which helps me continue to create meaningful content for you!
I look forward to sharing more of my home with you and inspiring you to enjoy simple cozy living!
Follow me on Facebook, Instagram, Pinterest, and LIKEtoKNOW.it.
xoxo, heidi
Don’t forget to pin this for later…

shop the post


Hi Renae! I will look for your website! Thank you for taking the time to read the blog and comment!!!
I love this so much. The napkins are so lovely. I would love it if you would share this on The Fabulous Friday Link Party. You can find the link on my website. Hugs to you.
Thank you so much Cindy! I appreciate you taking the time to read my blog post and for the feature tomorrow. I’ll be on the lookout for your blog post!!!
Those turned out perfectly and I adore the idea. I’m not sure why but I’ve never thought to do that. Obviously, I’m not that creative. Thanks so much for sharing it with us on Farmhouse Friday LP. I’m featuring the post tomorrow. Hope you link up again soon. Pinned
Absolutely, thank you so much for sharing!!!
I found your post from the link party over at Cindy at County Road 407’s blog. I’m so happy I did. These are just the cutest! I love you simple, yet beautiful they are. Perfect for Easter. I’d love to share a link to your post in my weekly round-up tomorrow.
Thank you Denise! This was my first time making them and they couldn’t have turned out cuter! I’m thinking of doing more for other holidays. Thank you for visiting the blog!
Gorgeous Heidis! I have never tried anything like this before but your tutorial makes me want to give it a try. Thanks so much for sharing! Have a wonderful weekend!
Thank you! So simple but so adorable!
Thank you Ann Marie! They really are so cute!
Looooove these!!
????????????????????
These are adorable! Such a simple sweet touch!