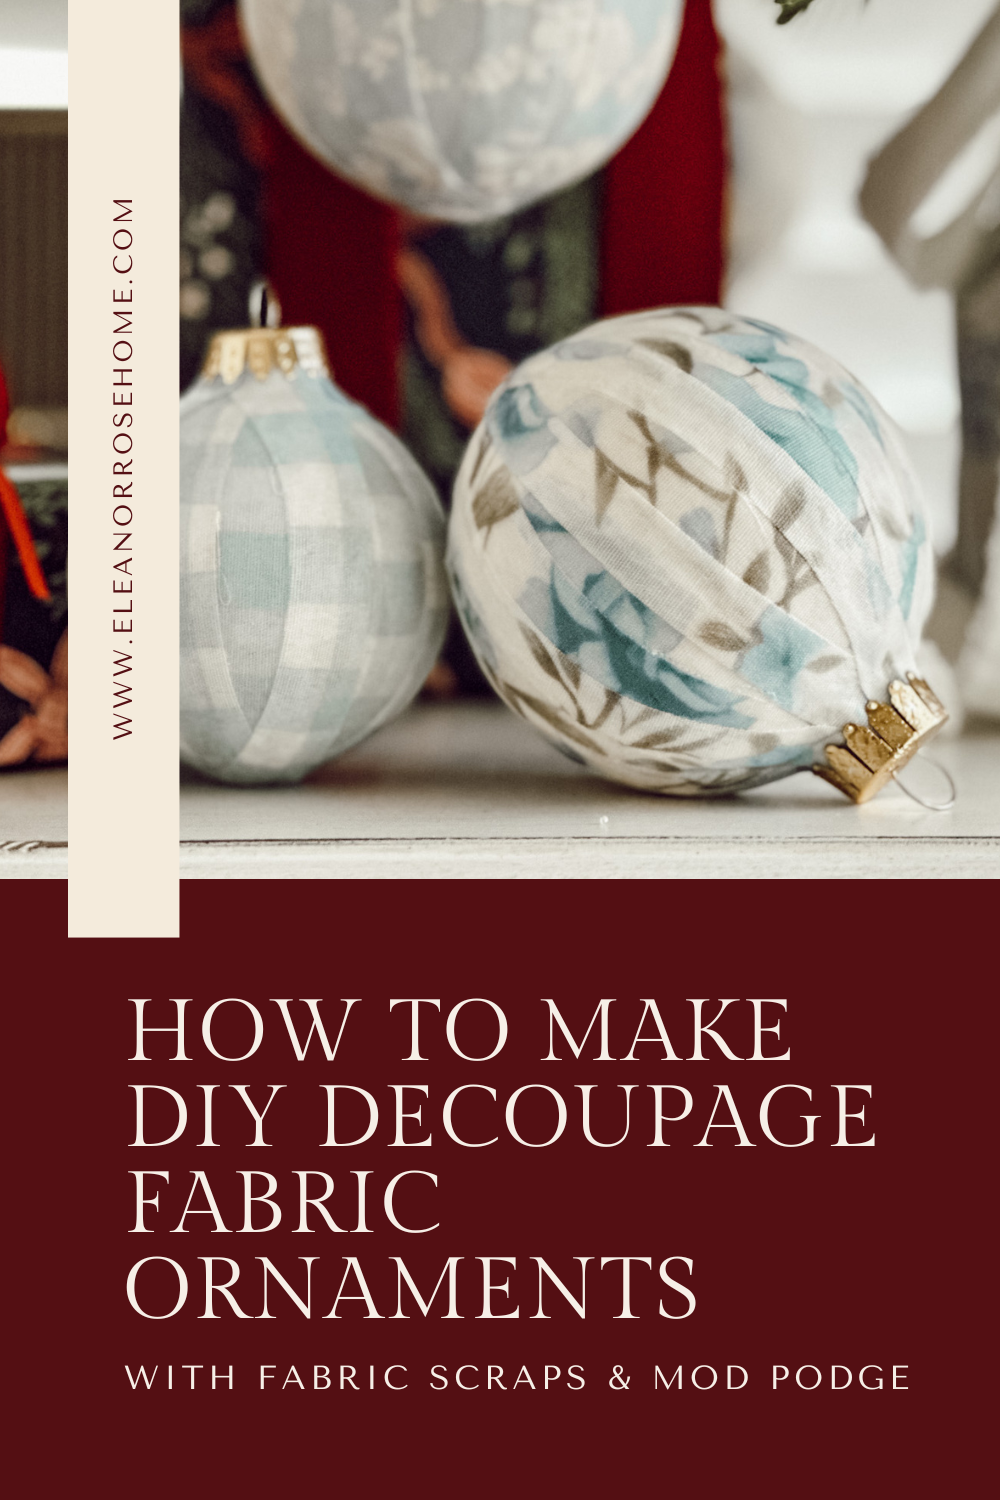
How to Make DIY Decoupage Fabric Ornaments With Mod Podge
 Shop This Post

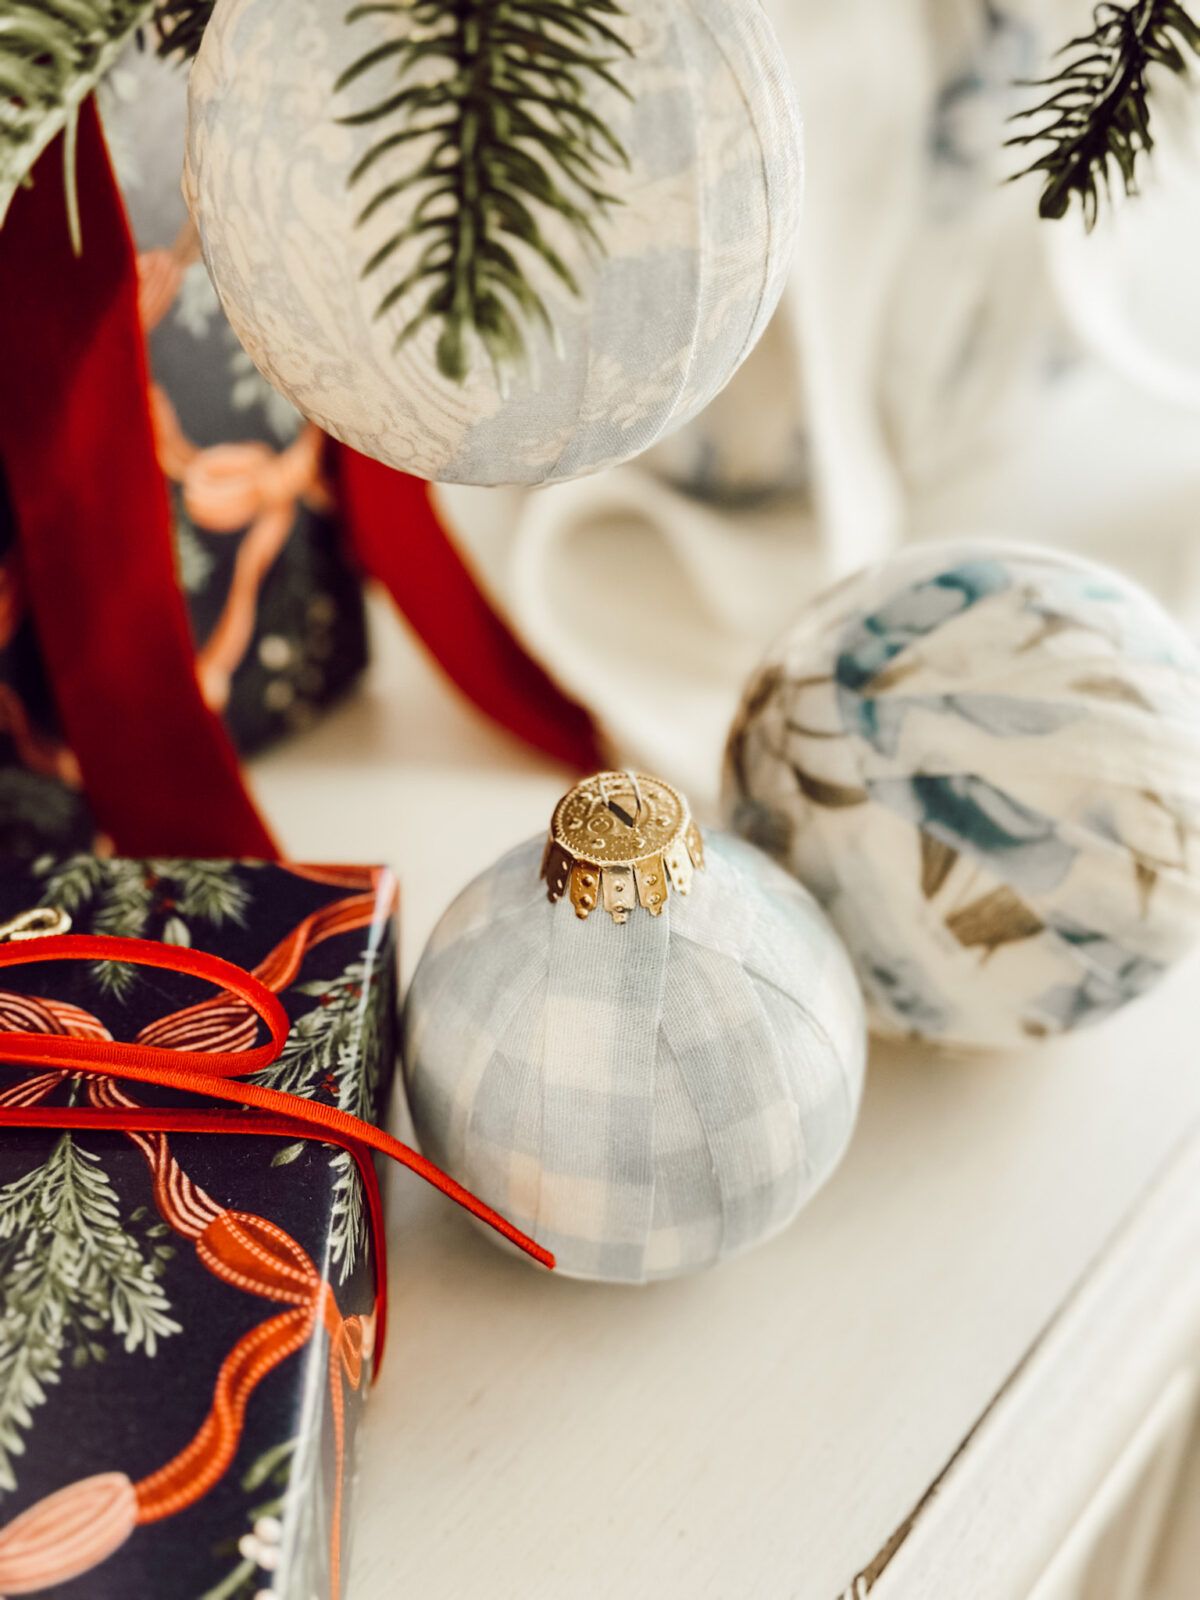
Learn how to make DIY decoupage fabric ornaments using Mod Podge and fabric strips. An easy, cozy Christmas craft perfect for any tree.

Every holiday season I LOVE to make handmade ornaments.
It’s a simple tradition but one that makes Christmas, well feel like Christmas for me.
You might remember some of the ornaments I’ve made throughout the years…
Like the salt dough gingerbread ones, bottle brush tree ornaments, star shaped air dry clay ornaments, or even the dried orange slice ornaments that always make the whole house smell heavenly.
There’s something wonderful about pulling out those ornaments each December and remembering exactly when (and why) you made them.
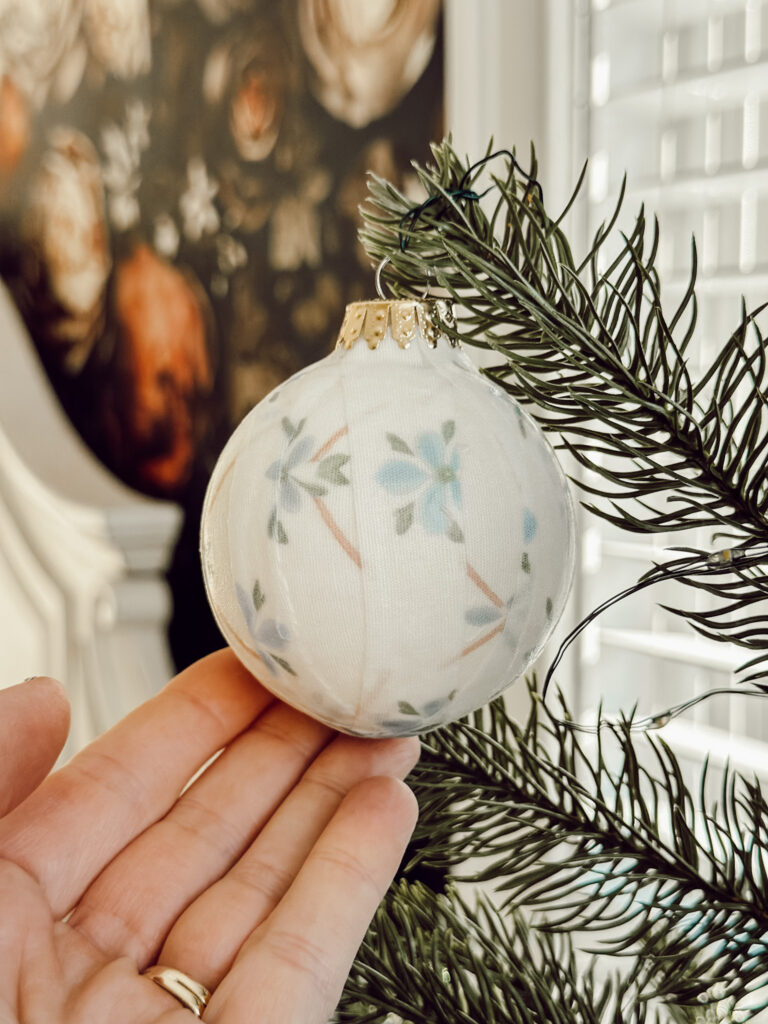
This year’s ornament project started with a few velvet covered ornaments I wasn’t loving, at all.
Instead of tossing them back in the bin (like I normally would…you know, out of sight, out of mind), I decided to give them a little makeover with fabric and Mod Podge.
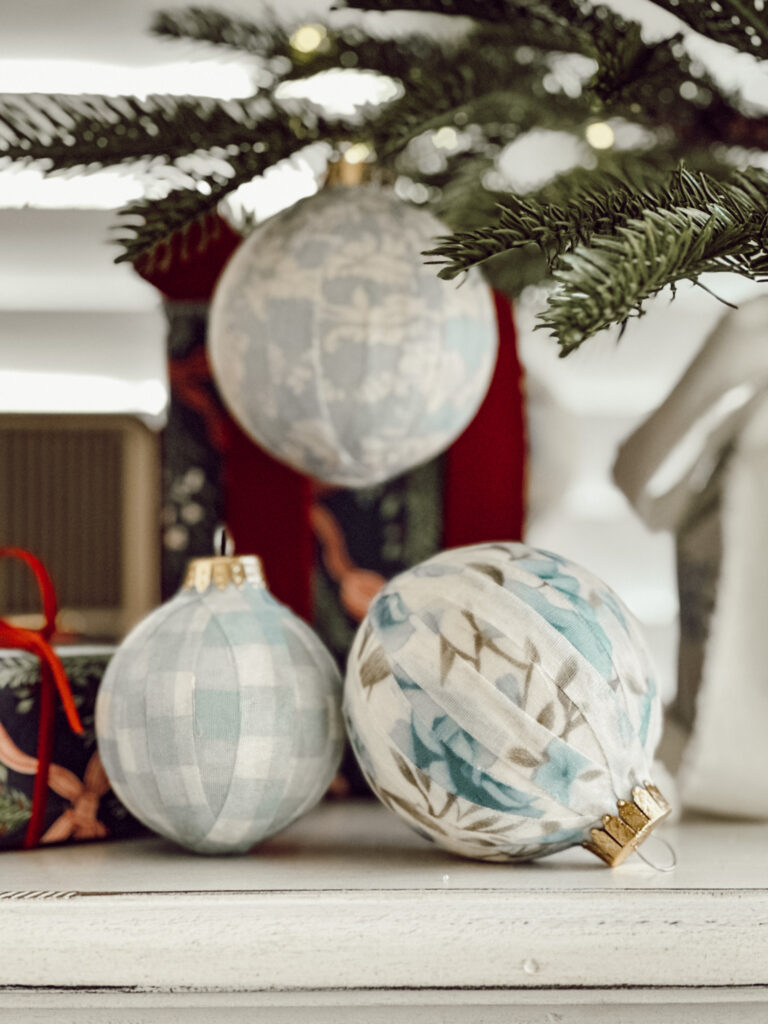
And they turned out even cuter than I expected!
Cozy, textured, nostalgic, really everything a handmade ornament should be.
I’m sharing how to make these DIY decoupage fabric ornaments so you can create your own set whether you’re giving old ornaments a fresh look, using up scrap fabric, or just wanting a relaxing craft to enjoy the holiday season.
What You’ll Love About This DIY:
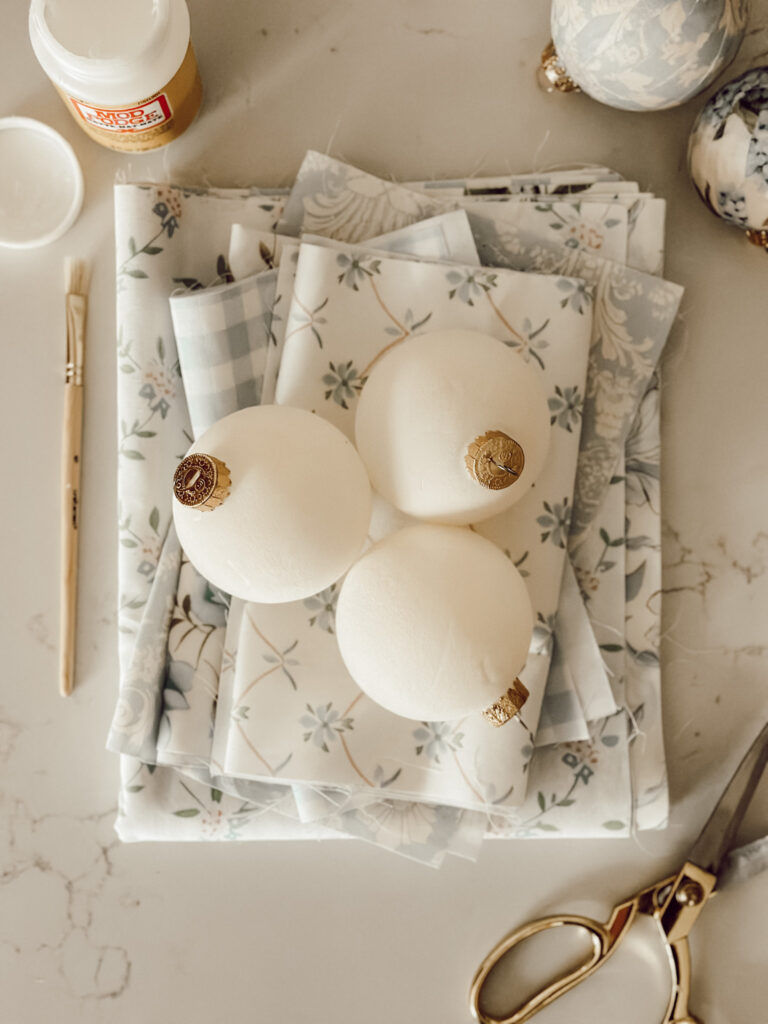
Supplies You’ll Need to Make These DIY Decoupage Fabric Ornaments
Gather these materials to make your own custom ornaments…
LITTLE NOTE FROM HEIDI: I used velvet covered glass ornaments for this DIY because they weren’t my favorite anymore, and instead of tossing them, I decided to give them a little makeover with decoupage. It worked great in the end, but the velvet surface isn’t the easiest for fabric to adhere to, so you may need a bit more Mod Podge and patience as you smooth the strips into place. If you’re using smooth plastic or glass ornaments, the process will be much easier.
materials you’ll need
*If you make a purchase using one of these links, I may receive a small commission. This does not add any cost to you, but helps me to continue to create & share meaningful content. Thank you for supporting my small business!
I’m Heidi, the heart and hands behind Eleanor Rose Home.

I’ll show you that your home can become a place of warmth, comfort, and style with practical tips, creative ideas, and my own journey to help you create a space that feels like you…welcoming, personal, and full of charm.
How to Make Fabric and Mod Podge DIY Ornaments
If you’ve never made decoupage ornaments before, you’ll be surprised at just how easy (and fun) this method is.
cozy ideas delivered to your inbox
When you join our newsletter!
Just follow these simple steps and you’ll have beautiful, custom ornaments for your Christmas tree.
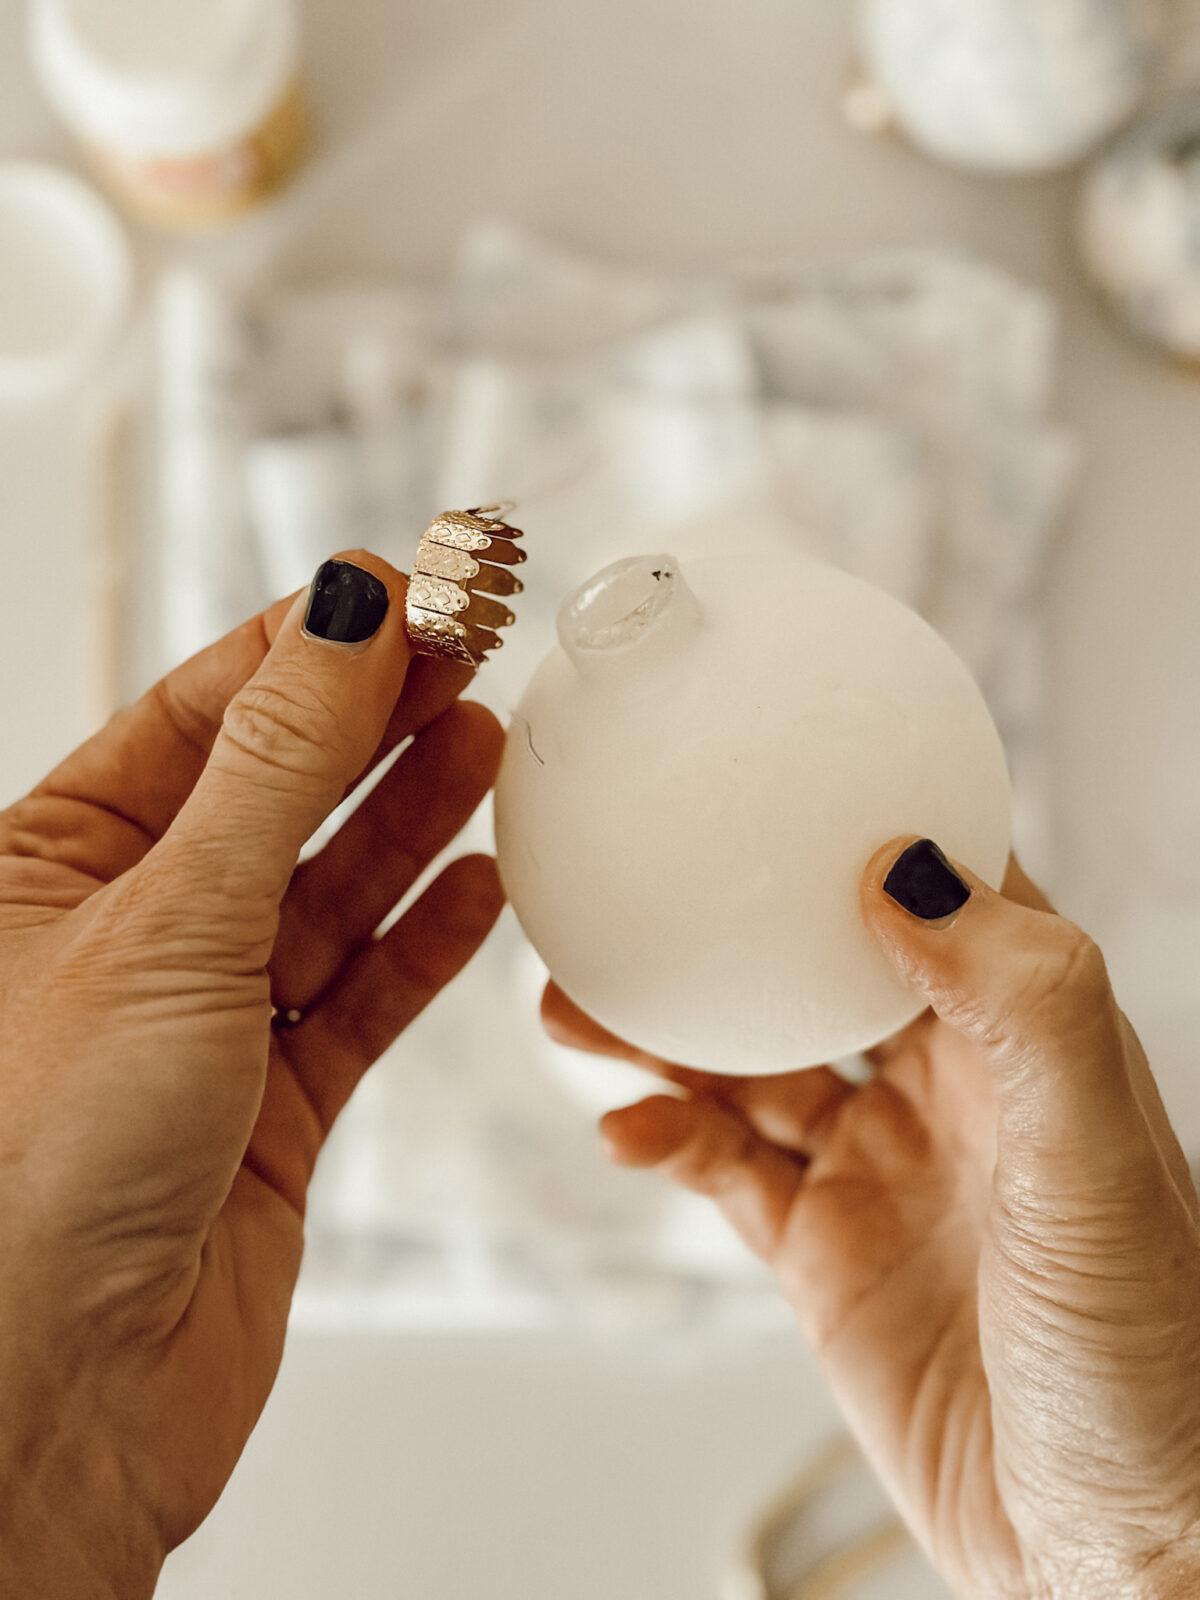
01
Remove the Ornament Cap
Gently pull off the little metal (or plastic) ornament cap from the top of your ornament.
This makes it much easier to wrap the fabric evenly around the entire surface. You’ll pop it back on once everything is dry.
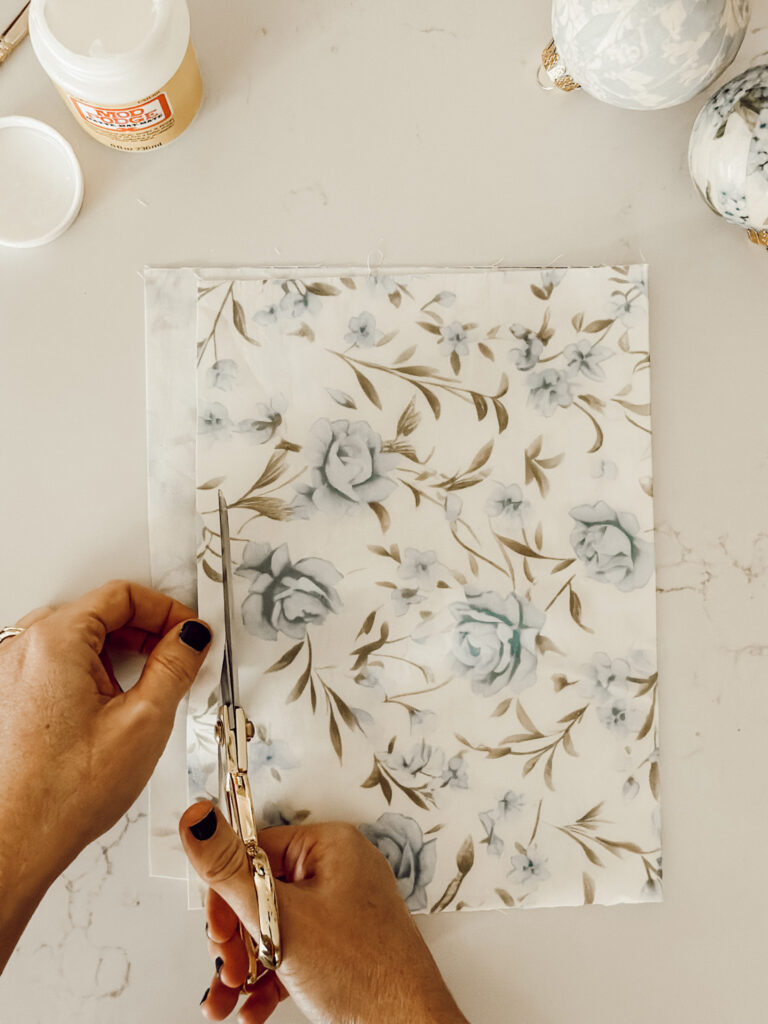
02
Cut Your Fabric Into Strips
Cut your fabric into 1/2″ wide strips. The length will depend on the circumference of the ornament you’re using, so just cut your strips long enough to wrap fully around your ornament with a little overlap. Cotton fabrics work best because they mold easily once coated with Mod Podge. You’ll need anywhere from about 10-15 fabric strips per ornament, again depending on the size.

03
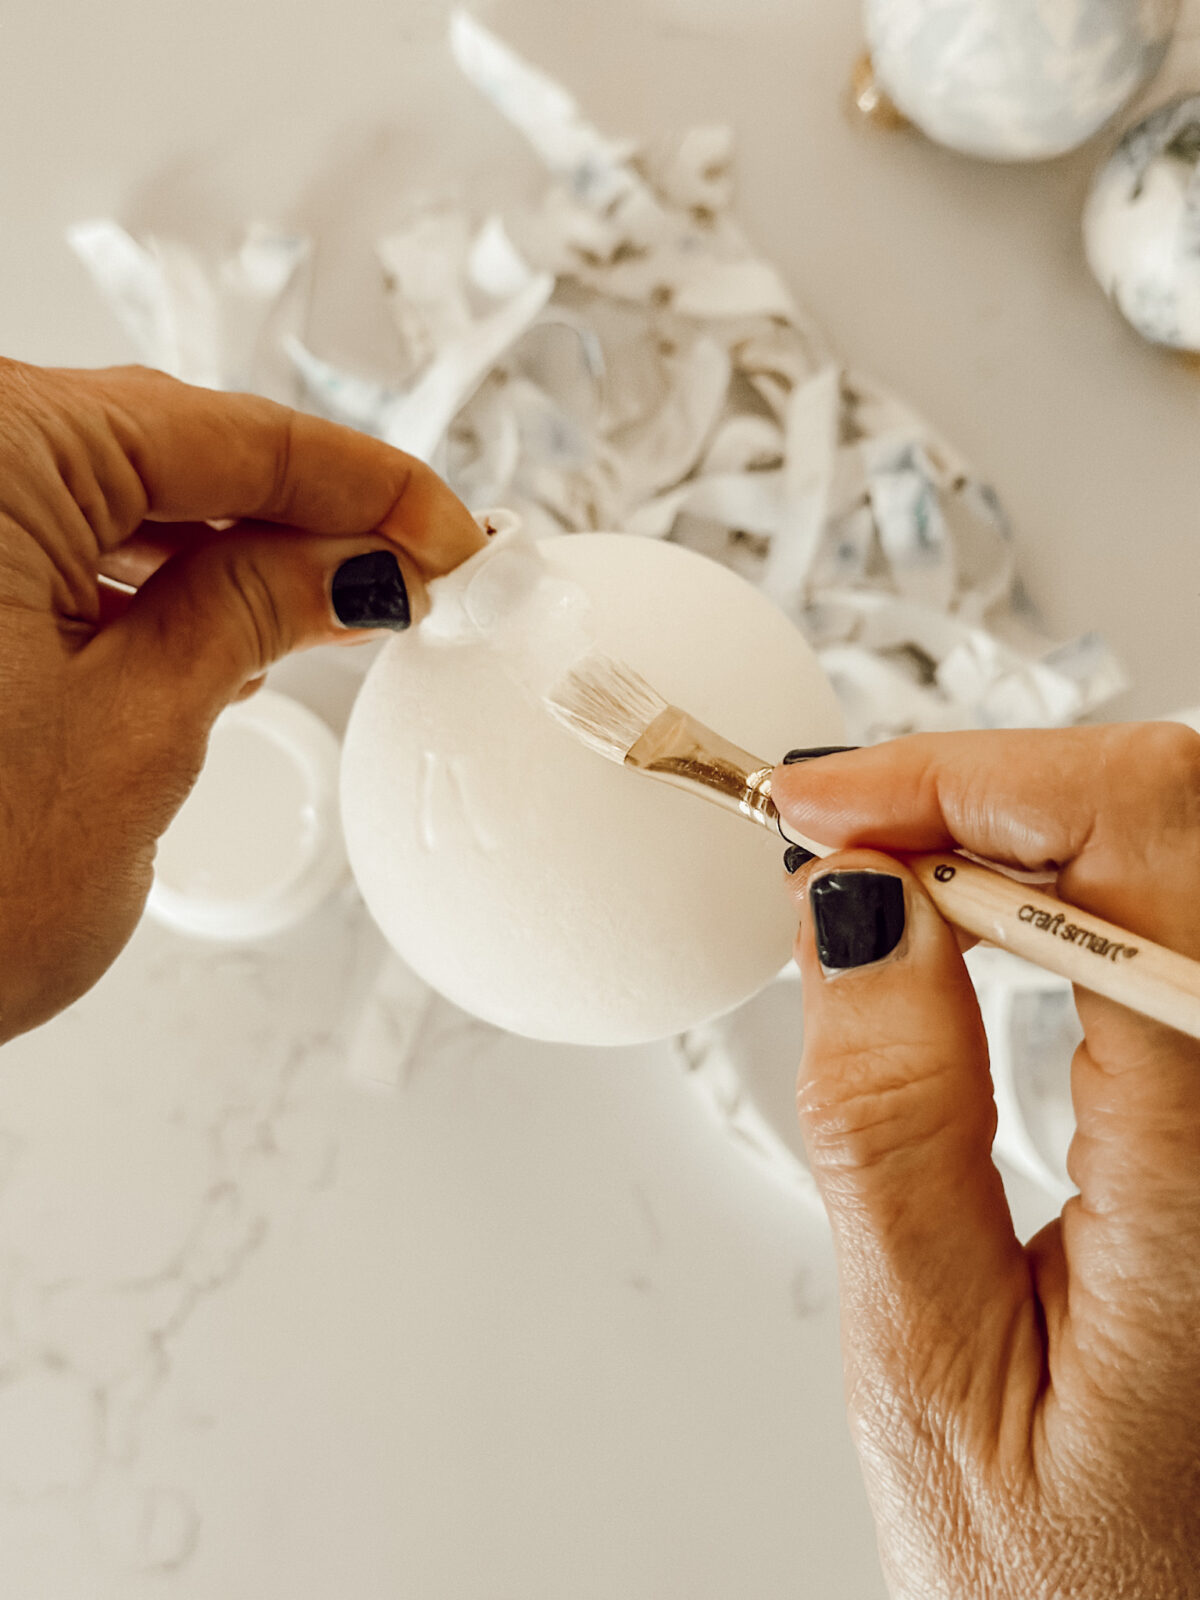
Brush Mod Podge on Part of the Ornament
Start by brushing a thin layer of Mod Podge onto a small section of the ornament. Working in sections will prevent drying before you place your fabric strip.
04
Wrap a Fabric Strip Around the Ornament
Place one end of the strip near the top of the ornament and gently wrap it around, smoothing with the paintbrush as you go. Add a little more Mod Podge on top of the strip as you wrap to help it adhere.
05
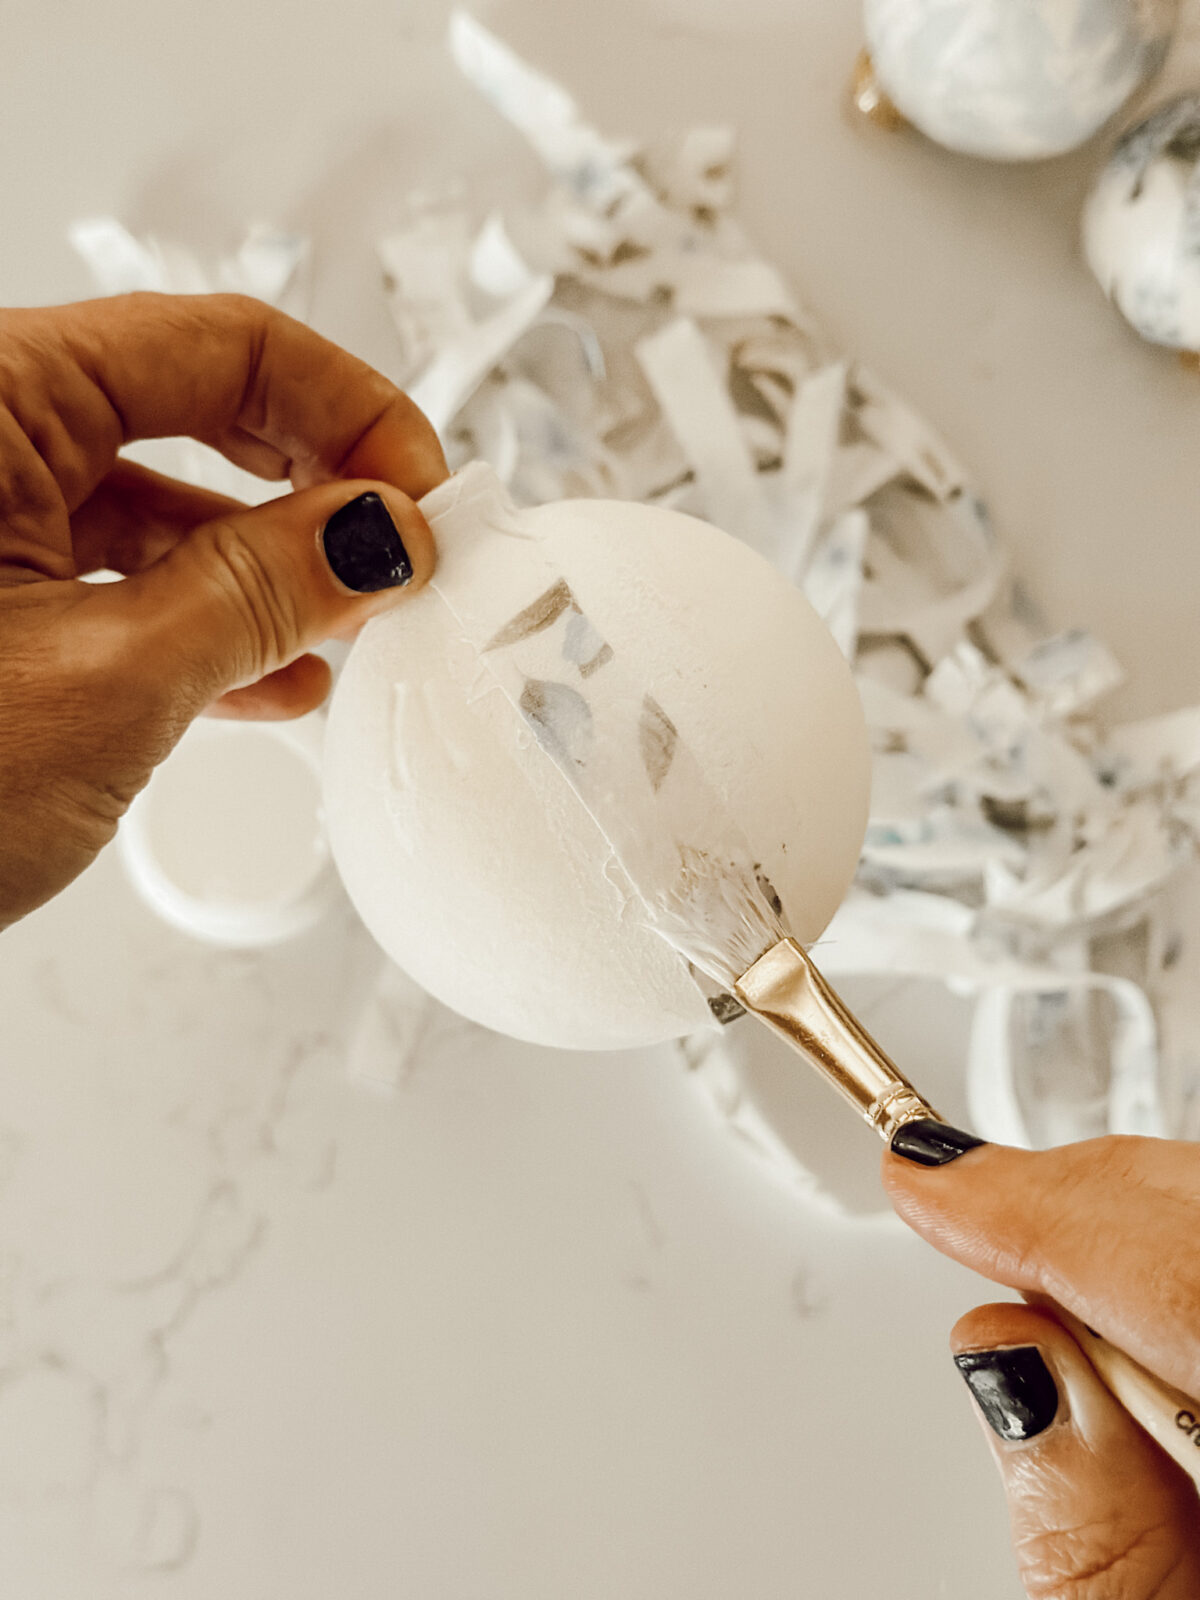
Continue Wrapping Until the Ornament Is Covered
Overlap each strip slightly as you continue wrapping around the ornament. If you notice any puckering or bumps, dab on a bit more Mod Podge and smooth it down with your brush or fingers. Keep wrapping until the entire ornament is completely covered. Don’t worry about how the top of the ornament looks, the ornament cap will cover it.

06
Let the Ornament Dry
Place the opening of the ornament over a wooden skewer and stand the skewer upright in a piece of styrofoam. This keeps the ornament upside down, allows air to circulate evenly, and prevents the fabric from sticking to your work surface. It typically dries within an hour or two, but I like to have them sit overnight for the most durable result. (Sorry, I forgot to take a photo of this step!)
07
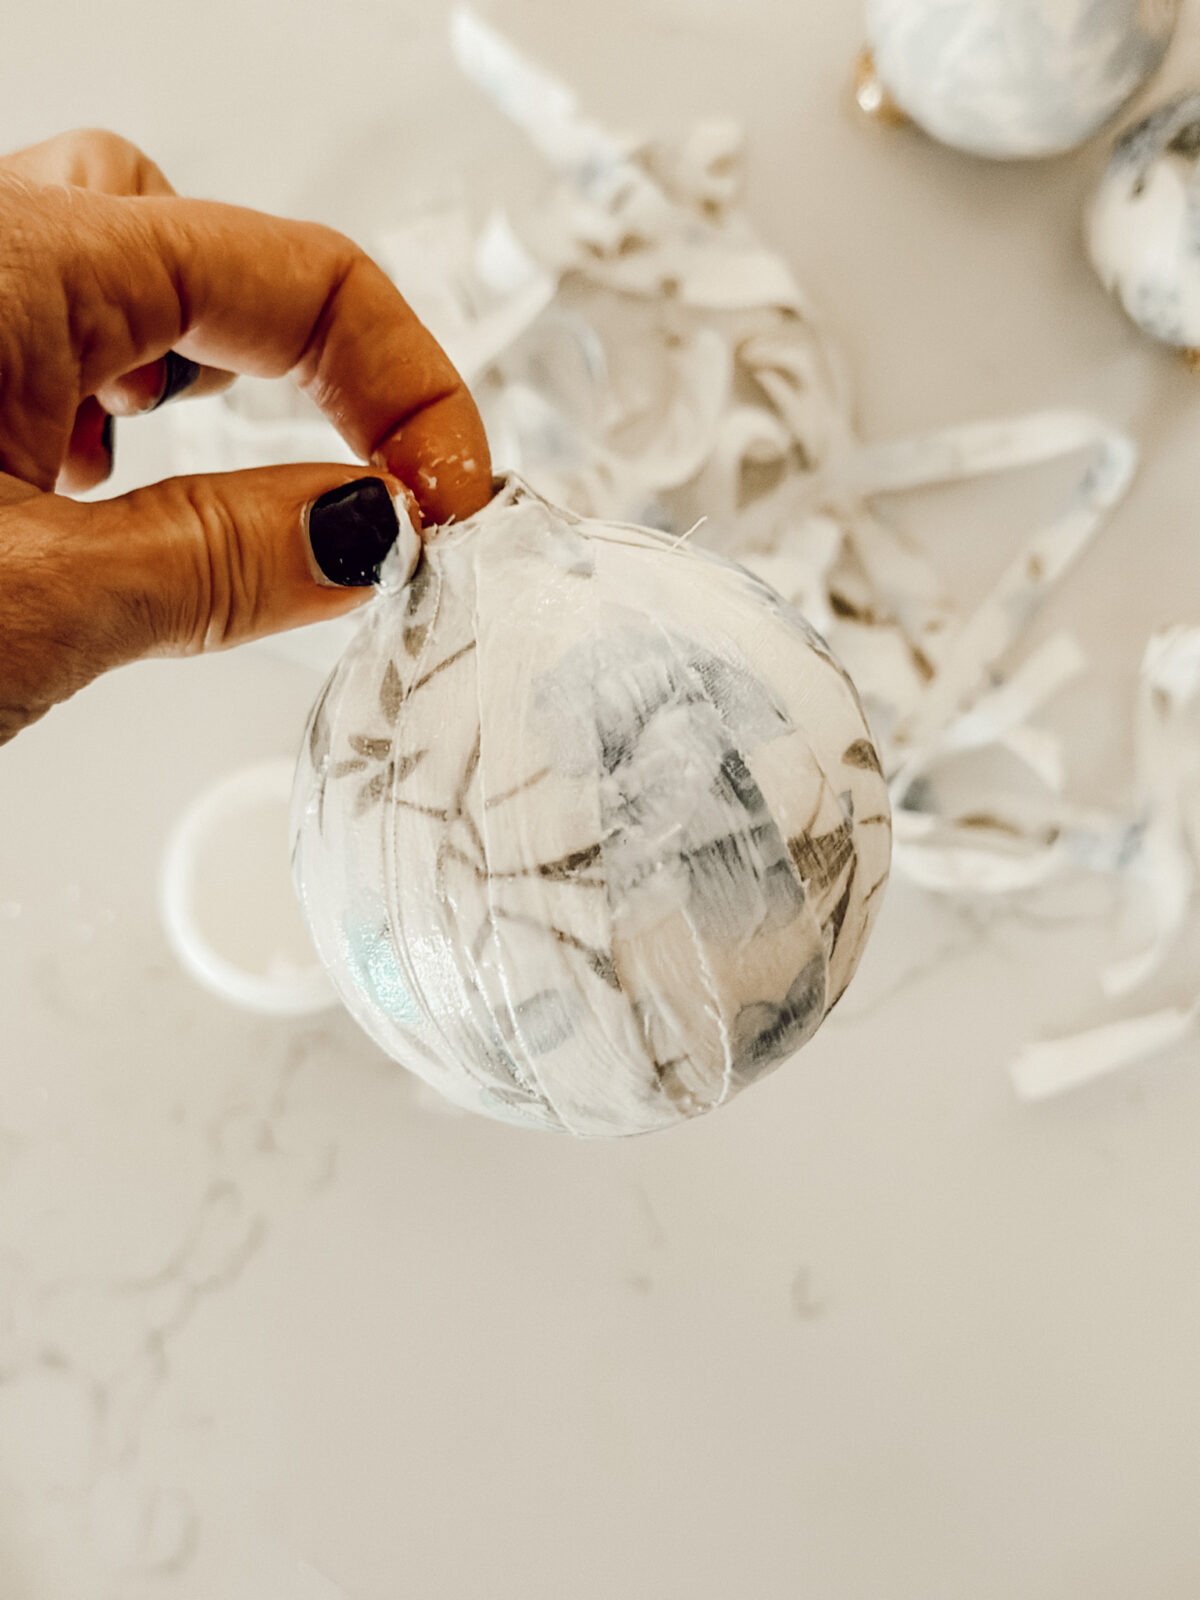
Seal the Ornament With Mod Podge
Brush a final thin coat of Mod Podge over the entire surface. This helps seal the fabric and gives the ornament a soft, matte finish. Let that dry for an hour or so.
08
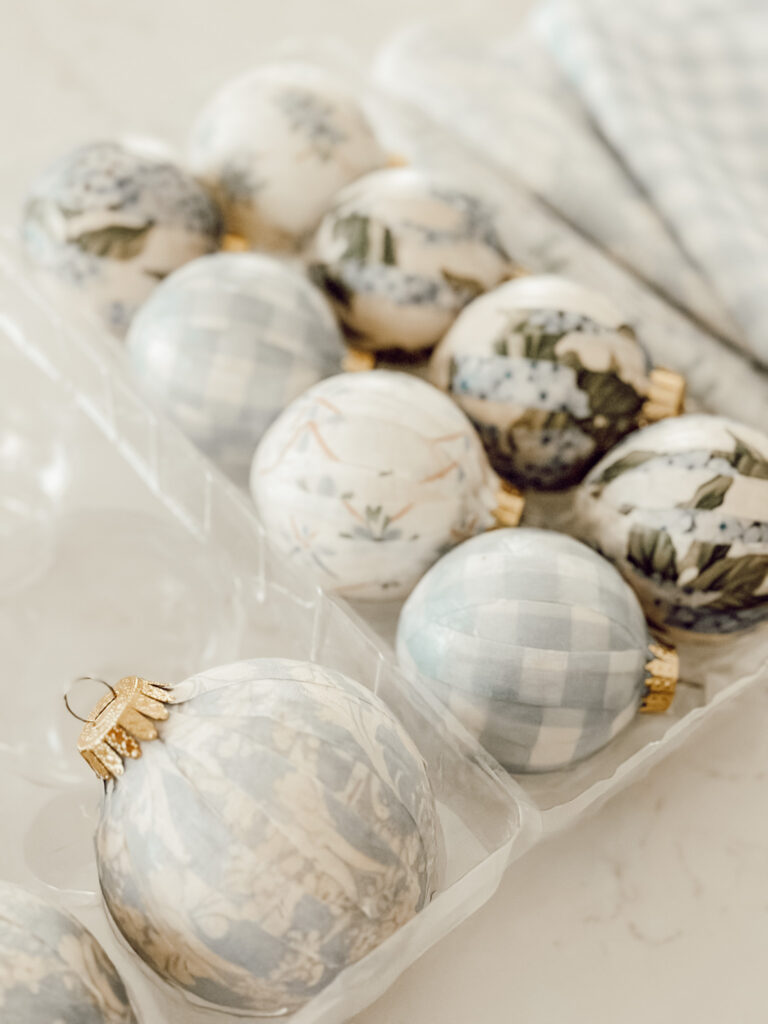
Add the Ornament Cap and Hang
Once the ornament is completely dry, pop the ornament cap back on. I hung mine with a simple ornament hook, but you can add ribbon or twine if you prefer a more decorative look. Either way, your ornaments are now ready for the Christmas tree!
Helpful Tips
- Thin cotton fabric molds to the ornament easier than thicker fabrics.
- Work in small sections. Mod Podge dries quickly, so brushing on a little at a time helps the fabric adhere smoothly.
- Make sure to overlap the fabric strips slightly to create seamless coverage and prevent the original ornament from showing through underneath.
- If you’re having trouble with the fabric sticking to the ornament, add a little extra Mod Podge and hold the fabric strip in place for a few seconds until it adheres.
- The decoupage ornaments may feel dry after an hour, but overnight drying creates a stronger, smoother finish.
- This craft is perfect for giving new life to ornaments you don’t love anymore, just cover them and enjoy a fresh look!
Fabric Ideas to Make Cozy Ornaments
If you want your ornaments to feel timeless, warm, and a little nostalgic, these are the fabrics I would use…
Hey friend! What can I help you find?
Search our entire site!
- Gingham
- Ticking Stripe
- Calico Prints
- Quilt Scraps
- Florals
- Plaid or Tartan
- Vintage Inspired Holiday Prints
How to Store Decoupaged Christmas Ornaments
Handmade ornaments deserve a little extra care, and storing them properly will help them last for years to come.
Here’s the best way to protect your decoupaged ornaments so they stay looking beautiful season after season…
- Wrap each ornament individually in soft tissue paper or bubble wrap to prevent scratches or dents.
- Use a divided ornament storage box so each ornament has its own little compartment.
- Store in a cool, dry place away from heat or moisture, which can cause the Mod Podge to soften over time.
- If you’ve added ribbon bows or embellishments, store those facing upward to keep them from flattening.
DIY Decoupage Ornament Frequently Asked Questions
Are there other materials I can use to decoupage an ornament besides fabric?
Yes! You could also use tissue paper, decorative napkins, wrapping paper, book pages, sheet music, scrapbook paper, printed vintage letters or postcards, or paper doilies. Just be sure the material is thin and flexible enough to mold around the ornament for the smoothest finish.
Can I use any type of fabric for this DIY?
Lightweight cotton or linen works best because it molds easily to the ornament. Thicker fabrics are harder to bend around the rounded surface making them much harder to work with.
Do I have to use Mod Podge or will another glue work?
Mod Podge is best because it acts as both a glue and sealer.
What if the fabric won’t stick to my ornament?
This can happen with textured surfaces like velvet (I know from experience). Just use a bit more Mod Podge and press the fabric in place for a few extra seconds until it softens and adheres.

Did you make these Christmas ornaments?
Mention us @eleanorrosehome or tag us using #eleanorrosehome so we can see your creations. You can also leave a comment below!
You Might Also Enjoy
-
DIY Easter Candy Jar for Gifts, Decor, and Spring Treats
Create a DIY Easter candy jar with this easy spring craft idea. Perfect for filling with treats, decorating your home,…
-
Free Printable Easter Wall Art for Cozy Cottage Style Decor
Free printable Easter wall art to decorate your home for spring. These cozy cottage inspired designs are great for frames,…
-
Grandma Hobbies: A Cozy Cure for Anxiety and Overthinking
Grandma hobbies are trending for a reason. Learn how simple, nostalgic crafts and analog activities can help overthinking and calm…


Shop My Favorite Products
Shop my favorite home decor & lifestyle products, my LTK sources, and my Amazon Storefront.
By making a purchase with one of my affiliate links, I earn a small commission which helps me continue to create meaningful content for you!
I look forward to sharing more of my home with you and inspiring you to enjoy simple cozy living!
Follow me on Facebook, Instagram, Pinterest, and LIKEtoKNOW.it.
xoxo, Heidi


Don’t forget to pin this for later!
Shop this post


One Comment