
How to Make DIY No Sew Curtains the Quick & Easy Way
Discover a quick and easy way to transform your windows with this step by step tutorial on how to make DIY no sew curtains using tablecloths. No sewing or cutting required with this budget-friendly DIY idea!

I decided it was time to give our living room a little refresh with some fresh, new window treatments.
Last winter, I made these no-sew curtains out of tablecloths and while I’ve loved them in our living room, one thing has been driving me nuts. There has only been one panel on each window, when what I really wanted was a pair of curtains framing both sides of the window.
But unfortunately, the tablecloths I decided to make into curtains last year were on clearance, and I could only purchase two of them instead of the four I really wanted.
So, I recently went on the hunt for new curtains to replace our current ones.
Well let me tell you…I was shocked at the price of curtains! Most of the curtains I loved were almost $200 per panel. What???!!! There was no way I was going to pay $800 for four curtains when I change the decor in our house like most people change their underwear!
I knew I was going to have to make my own no sew curtains again if I wanted to achieve the look I was going for without spending a fortune.

If you are someone that can’t sew like me and want to update the curtains in your home in an inexpensive way, then this blog post is for you!
Making traditional curtains at home could not be easier with this tutorial. You can make beautiful, custom window treatments for your home without any sewing experience, no sewing machine, and you don’t even need a pair of scissors.
Choosing the Right Material for Your No Sew DIY Curtains
Before we dive into the tutorial on how to make your own curtains at home, the first step is deciding what material you’re going to make your curtains out of.
I used tablecloths to make our curtains, however there are other ways to make no sew DIY window treatments at home using sheets or even paint drop cloths.

You’ll want to consider the ambiance you want to achieve, the level of privacy and light control needed, as well as your budget when choosing the perfect material for your DIY curtains.
When choosing materials consider the following curtain options:
- Tablecloths
- Gorgeous Patterns and Textures
- Wide Variety of Colors
- Instant Touch of Sophistication
- Flat Sheets
- Versatile Materials Like Cotton or Linen
- Readily Available in Various Colors and Sizes
- Easy to Work With and Customize
- Drop Cloths
- Durable, Sturdy Fabric (Often made of canvas or cotton.)
- Budget Friendly Option
- Ideal for Achieving a Rustic or Industrial Look
Each option provides a unique look and feel, allowing you to personalize your home decor according to your taste and style preferences.
In this blog post, we’ll be focusing on how to make ready-made curtains specifically out of tablecloths.
Measure Windows to Determine the Right Size Tablecloth You’ll Need
Next, you’ll need to determine the right size tablecloth for your window.
Start by measuring the window’s height and width using a tape measure.
For the height, measure from the curtain rod (curtain rods should be installed at least 4-6″ above the top of the window) or the point where you want the curtains to start, down to the desired length. Take into account if you want to the bottom of your curtains to puddle on the floor or hit just above the floor.

Measure the width of the window frame from one side to the other adding about 6-9″ on either side, if you have the room. We do not in our living room, so we can’t extend the sides of each panel any further than the window frame.
Once you have these measurements, look for a tablecloth that matches or exceeds your height and width requirements.
Opt for a tablecloth that is at least twice the width of your window for a fuller, gathered look when the curtains are closed.
Having precise measurements as well as choosing a tablecloth with the appropriate dimensions will result in curtains that fit your window perfectly.
No Sew Curtain Supplies
For this tutorial I am sharing how to make no sew curtains using tablecloths, however if you choose to use flat sheets or drop cloths the supplies needed and the instructions are about the same.

SUPPLIES YOU’LL NEED

What I love About The Tablecloth I Choose to Make Into Curtains
I searched high and low for the perfect tablecloth to transform into curtains. I was beyond excited when I stumbled upon this exquisite green floral patterned tablecloth from H&M.
The gorgeous green printed pattern instantly caught my eye, and I thought it would add a nature inspired freshness to our home.

The great thing about this tablecloth is that it is made from 100% cotton which means it’s soft with a natural drape; resulting in an elegant yet comfortable look to the curtains.
Cotton is breathable and lightweight making it the perfect curtain material for allowing the right amount of natural light to filter through while also providing privacy.
The blend of the gorgeous floral design and the comforting feel of cotton not only enhances our room’s aesthetic but also creates a warm, cozy atmosphere that I just love.
Shop Tablecloths From H&M
The Simple Steps to Make No Sew Curtains
Step 1: Iron Curtains
Before hanging your tablecloth curtains, you’ll want to make sure they look polished and pristine.
Lay the curtains flat on an ironing board or any smooth, heat resistant surface.
Use a medium to high heat setting on your iron, depending on the fabric of your curtains. For cotton or linen curtains, a hot iron (with steam) is the easiest way to release wrinkles.
Hey friend! What can I help you find?
Search our entire site!
Gently run the iron over the fabric, smoothing out any wrinkles or creases.
Pay special attention to the hems and edges, making sure they are well pressed for a professional finish.
Step 2: Fold Over Extra Fabric at the Top of the Curtain
With your freshly ironed curtains ready, it’s time to prepare them for easy hanging.
Lay the backside of the curtain facing up on a clean, flat surface.
Based on the measurements of how long your curtains need to be, fold over the extra fabric at the top of the curtain.
For example, if your curtains need to be 90″ long, but your tablecloth is 120″ long, you’re going to fold over 30″ at the top of your curtain.
Using a tape measure, make sure the fold of excess fabric is even and in a straight line all the way across the top of the curtain.
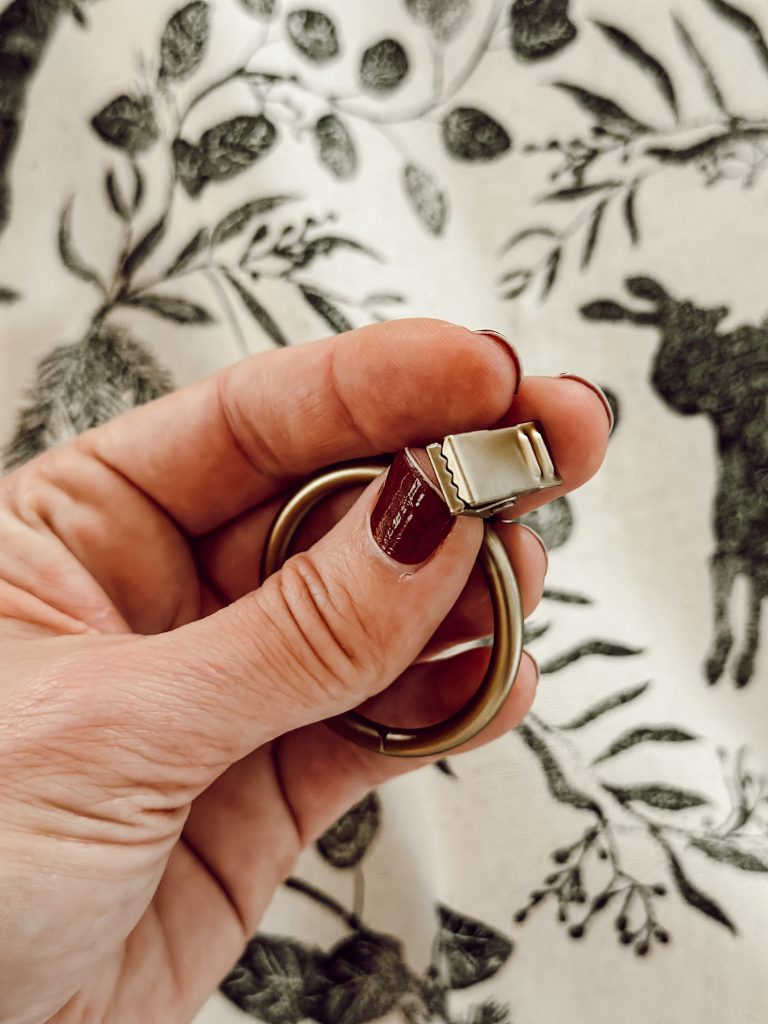
Step 3: Attach Curtain Rings on Curtains
The next step is to evenly distribute the clip rings along the top edge of each panel.
The general rule of thumb is to place a ring every 4-8″. I placed our curtain rings about 7″ apart so that the rings were evenly placed based on the width of the panel.

To make your curtains resemble the look of pinch pleat curtains, don’t simply attach the clips to the curtain.
Instead, pinch the fabric together on the folded edge, gently open the clips, and attach them to the fabric. Make sure they grip securely without damaging the material.
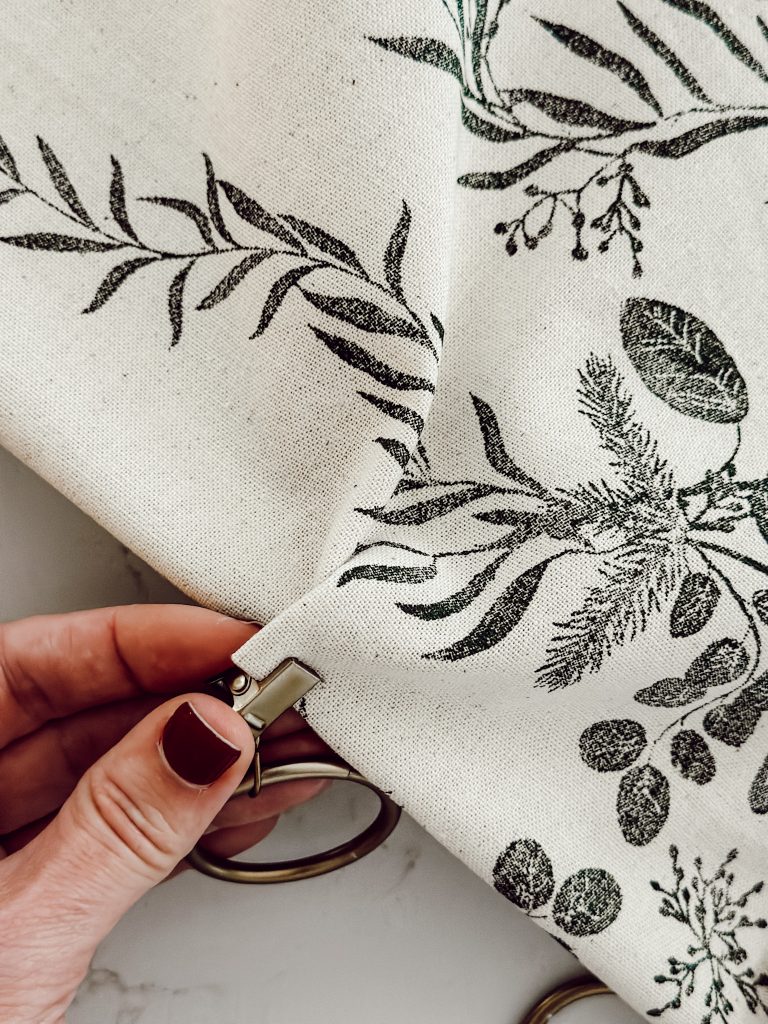
This creates more of a structured, polished look once your curtains are hanging on the rod.
Step 4: Hang Your Curtains
Slide the curtain rings holding the curtain panel onto the curtain rod.

Adjust the panels evenly along the rod, ensuring the bottom of the curtain is hanging at your desired length.
Take a step back and admire how your space is instantly transformed with the addition of tablecloths that you made into curtains!
Things to Consider When it Comes to Making DIY Curtains
When making curtains out of tablecloths, here are a few tips and tricks that will help you achieve the best results:
- Choose the Right Tablecloth: Opt for a tablecloth made of durable and quality fabric. Cotton, linen, or polyester blends work well for curtains. Consider the thickness and weight of the fabric based on your preference for light filtering or blackout curtains.
- Measure Carefully: Accurate measurements are essential. Measure your windows and the tablecloth precisely to ensure the curtains will fit well.
- Consider Pattern Placement: If your tablecloth has a specific pattern, consider how it will align when the curtains are hanging.
- Customize Length: Tablecloths come in various lengths. If the tablecloth you love is too long, you can easily fold over the extra fabric to make the curtains your desired length.
- Maintenance and Cleaning: Consider the care instructions of the tablecloth fabric. Some materials may require special care when it comes to washing and ironing. Choosing a fabric that is easy to maintain will ensure your curtains look great for a long time.
Download Your Free Homemade Christmas Gifts eBook
How much do DIY no sew curtains using tablecloths cost?
The cost of DIY no sew curtains using tablecloths can vary widely depending on several factors; the type and quality of the tablecloth, the size of your windows, and how many windows you’re covering.

This DIY only cost me around $100 for the four tablecloths (all the other supplies I already had on hand). Far less than the $800 I would have spent on curtain panels from the store!
Note: When shopping for tablecloths, keep an eye out for seasonal sales and discounts for an easy way to save money. I was able to snag these tablecloths at 20% off! Retailers often offer substantial discounts during events like end-of-season clearances, holiday sales, or special occasions like Black Friday and Cyber Monday. Also, consider joining store newsletters or loyalty programs, since members often receive exclusive discounts and early access to sales events.
Can I make no sew curtains from any type of tablecloth?
Yes, you can use various types of tablecloths such as cotton, linen, polyester, or even lace to create no-sew curtains.
Choose a tablecloth that suits your personal preference and complements your home decor.
Can I wash tablecloth curtains?
You sure can!
However, it’s important to check the care instructions on the tablecloth’s label to ensure proper washing and maintenance. Some fabrics may require delicate handling.
you might also
Enjoy These DIY Posts
Shop My Favorite Products
Shop my favorite home decor & lifestyle products, my LTK sources, and my Amazon Storefront. By making a purchase with one of my affiliate links, I earn a small commission which helps me continue to create meaningful content for you!
I look forward to sharing more of my home with you and inspiring you to have a well loved home! Follow me on Facebook, Instagram, Pinterest, and LIKEtoKNOW.it.
xoxo, heidi
Don’t forget to pin this for later…
shop the post


Hi Shirley, Thank you for much for your comment and sharing your story! I love that you have been doing this for years and embellish the curtains as well. Such a great way to make your home feel unique & special to you!
The tablecloths “curtains” are just beautiful! I’ve been doing this for many years now. I picked up a couple of tablecloths at World Market one year for a dinner party I was putting on but they were too short for the tables I had. I tossed them aside and bought another set that fit but I liked the first ones so much I decided not to return them figuring I could use the fabric for pillow covers or whatever at the time. When I had some free time I opened them up and laid them out over my couch to get some ideas and I could see how pretty they might look hanging in that same room, which is exactly what I did! They were the perfect size and I just loved them on the windows. Since then, they are more of a go-to than any regular curtains on the market! I even use them as decorative shower curtains. I also add decorative jewels to the bottom or the tops of many of them. It’s fun to just create my own looks.
Hi Juliana! Thank you for your comment. We customized our living room sectional at Jordan’s Furniture, a local furniture store here in the northeast.
Lovely idea! Was wondering if you could share info about your sofa?
Thanks
Juliana
Thank you Mary! Yes, I always pinch the curtains to create a pleat before adding curtain clips, it just elevates the look a little bit more!
Thank you so much!
Absolutely love your tablecloth curtains.
Heidi, I love your fabric selection for your curtains. And the one tip I have NEVER thought of is pinching a small pleat before clipping on the hooks….just brilliant. Thanks for sharing. Your photos are all gorgeous too!
Thank you Kim!
I love your curtains Heidi! The pattern looks perfect for your space.
Thank you Betty!!!
Love this great DIY Heidi! Love your DIY’s and budget friendly ideas. 🙂
Hi Cheryl, Thank you so much for your comment, you made my entire week! It makes my heart so happy to know that you are enjoying the blog, I appreciate you being here more than you know!
Hi Laura, I was so bummed that the tablecloth length I bought was sold out after I wrote this blog post. I’m going to keep checking H&M to see when it comes back in stock and will make sure to let you guys know!
Heidi, this is a fabulous idea and easy DIY! And I love the cloth you’ve chosen. I’m enjoying your blog immensely and love your ideas you share. You stand out like a diamond as much as my most favorite blogger I’ve been following for ten years. Many Blessings ??
I love love love the pattern in these curtains! I am bummed that the longer length seems to be sold out. I did pin this for future use though!