
Moss Wreath DIY
A DIY moss wreath is simple & easy to make with only a few supplies. It’s a beautiful addition to spring decor with it’s green hues, natural elements, and chunky textures.
As I was scrolling the internet recently on a hunt to find a new spring wreath for our home, I stumbled upon this mixed moss wreath from Anthropologie. I feel in love with it. It looked so beautiful with it’s chunky textures & assortment of mosses. However, what I didn’t love…the price tag. $150 for a moss wreath?! Nope that is not in the budget!
You may remember this Anthropologie dupe wreath I made at Christmas, if not you can check it out here. That wreath was almost $200 and I was able to DIY that wreath for $30. So, that gave me the confidence that I could easily duplicate this Anthro moss wreath for a fraction of what it would cost me to buy it online.

Now my DIY moss wreath may not look exactly like the one I found online, but it’s certainly close! And the fact that I made it myself, makes it all the more special. So, don’t spend a fortune on a moss wreath, let me show you how to make your own and you’ll love it even more than those store bought ones!

Spring Wreath Blog Hop
Today, I’m joining 8 blogging friends to bring you spring wreath ideas! There are so many beautiful wreaths in this blog hop, continue reading to the end of the blog post for links to all the spring wreath blog posts.

If this is your first time here, welcome! I’m Heidi, the creative mind behind the decor & lifestyle blog, Eleanor Rose Home. I’m a wife & mother who loves creating a cozy home for my family with new & vintage home decor, comfort food recipes, and DIY’s.
You can learn more about me, my family, and Eleanor Rose Home, here.
DIY Moss Wreath
Before I begin to show you how to make this moss wreath at home, I should warn you. This project is messy, very messy. However, it’s a fun messy project!
I had the best time ignoring the mess I was making, and enjoying the creative process. Find a space you don’t mind getting a little dirty (I used our kitchen island) and have fun using organic materials to create a beautiful spring wreath.
Let’s get started!

Supplies to Make a DIY Moss Wreath
Moss can be a little pricey. I had all the moss I needed in a bin in storage so this project only cost me about $6 for the straw wreath base. If you don’t have moss tucked away in a storage bin, Amazon & Michael’s are my go to suppliers for moss. I can find what I need and the prices are fairly inexpensive.
Pro Tip: I never pay full price at Michael’s. I always find coupons either in store or online for 20-40% off my full price purchase. Always keep an eye for coupons! If you can’t find any, ask the clerk at the register and almost every single time they will scan a discount coupon for you.
To make this project even more budget friendly, you can forage for moss if you have some growing near you.
- 1 package Basil Reindeer Moss
- 1 package Chartreuse Reindeer Moss
- 2 packages Forest Moss
- 2 packages Moss Variety Pack
- 2 packages Natural Dried Forest Moss
- 18″ Straw Wreath
- Hot Glue Gun & Hot Glue
- Vacuum (A must for this project!)


How to Make a Moss Wreath
Step 1
Clear a large area like a kitchen counter or island to place your wreath & moss on to create your DIY moss wreath.
Place the different mosses in piles so that you can easily grab them when making the wreath.

Step 2
Place the straw wreath curved side up on the counter (the flat side of the wreath is the backside so it sits flush against the wall or door).

Select any one of the mosses and begin gluing it to the straw wreath. I found that adding the glue to the backside of the moss was the best way to attach it to the wreath. Moss easily breaks into small chunks, making it very easy to work with and adhere to the wreath.

Add the moss in about 4″ sections to the wreath. Adding the moss to the wreath will resemble a jigsaw puzzle. You will want to piece the chunks of moss together just like a puzzle.

Make sure to cover the front & sides of the wreath base so no straw is showing. You do not need to add moss to the back of the wreath.
Step 3
Continue adding moss around the wreath in 4″ sections. I alternated forest moss & reindeer moss, and alternated the colors of the different mosses as well.

Now, you may need to vacuum your counter & floors a couple of times while adding the moss to the wreath. The moss will lose pieces along with dirt, so the counter can get very dirty.

Add moss to the entire wreath until the straw wreath is no longer visible.
Step 4
Once the straw wreath is covered with moss, your moss wreath is complete!

Hang it from a hook, on a wall or mantle, or from a door for beautiful, organic spring decor.
Moss Wreath DIY Tips & Tricks
- Your moss wreath will shed (not nearly as much as when you were making it) so you can seal it to prevent further shedding. I did not do this step but you could use an acrylic sealing spray, a fabric stiffening spray, or hairspray would work too.
- Clear a large, flat work space to make this wreath. Give yourself plenty of room to spread out the moss and a space you don’t mind getting dirty.
- Keep a vacuum on hand for this wreath project. Moss can be messy and a quick vacuum between moss sections will help to keep your space clean.
- Alternate the different moss varieties & colors to create a wreath that is chunky and visually appealing.
- Add a bow or other embellishments for more character & whimsy.
Where can I hang my moss wreath?
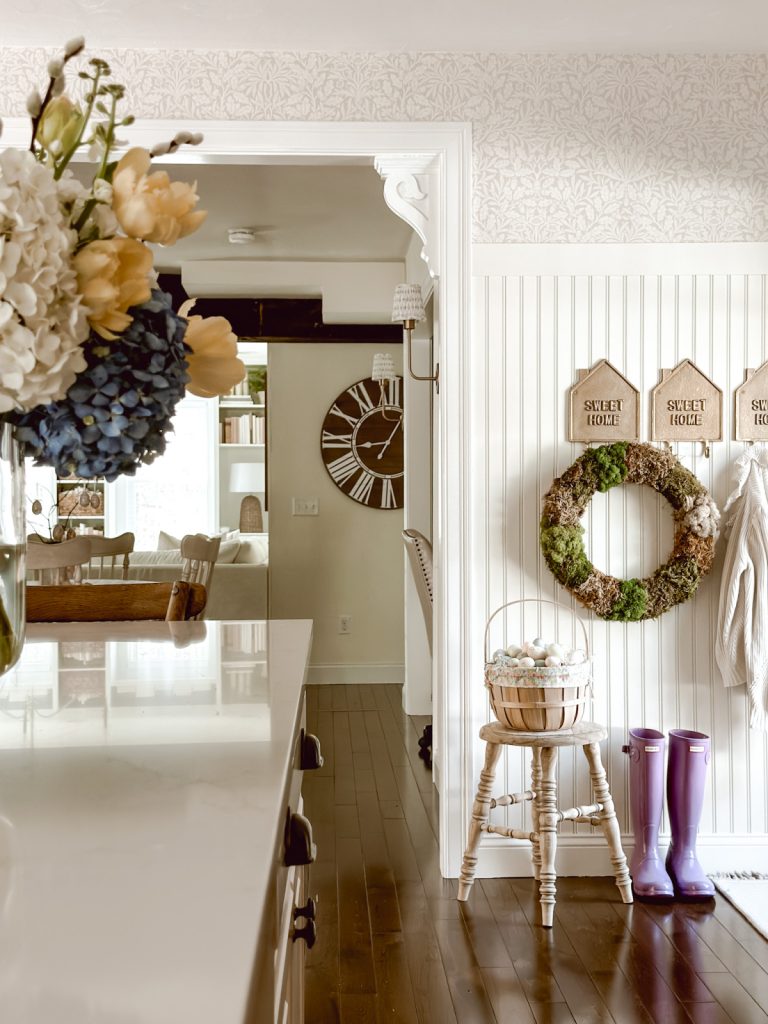
This moss wreath would look beautiful hung on a door, hook, or mantle. Our moss wreath is hung on hooks at our side entrance. I love the green colors and freshness it adds to this area of our home for spring.
I do not recommend hanging this wreath outdoors. In the elements, this wreath may come apart or mold since it’s made with all organic materials.
Keep this wreath inside and it will last for years!

More Spring Ideas
For more seasonal inspiration, DIY’s, and recipes for spring click here.
Don’t forget to check out all the spring wreath ideas at the end of the post!

Never miss a blog post when you become an Eleanor Rose Home insider. Insiders receive exclusive content, weekly newsletters, and so much more. Join the ERH community here!
Shop Our Home
Links to products featured in this post can be found in our Shop Our Home page. I hope this page makes shopping our home a little easier for you! I earn a small commission when you make a purchase from one of our LTK links. Your support helps me continue to create meaningful content for you!
I look forward to sharing more of my home with you and inspiring you to have a well loved home! Follow me on Facebook, Instagram, Pinterest, and LIKEtoKNOW.it.
xoxo, heidi

Blogger’s Best Spring Wreaths
- Modern Spring Wreath | My Sweet Savannah
- How To Make A Hydrangea Wreath | Modern Glam
- Moss Wreath DIY | Eleanor Rose Home
- The Fifteen Minute Spring Wreath DIY | My 100 Year Old Home
- Our New Home’s Easy Care Front Porch Decor | Classic Casual Home
- Spring Mushroom and Moss Wreath | Tatertots and Jello
- How to Make a Birds Nest From a Wreath | Craftberry Bush
- Book Page Wreath DIY | Happy Happy Nester
- Easy Birch Twig Spring Wreath | Most Lovely Things

Moss Wreath DIY
Materials
- 1 package Basil Reindeer Moss
- 1 package Chartreuse Reindeer Moss
- 2 packages Forest Moss
- 2 packages Moss Variety Pack
- 2 packages Natural Dried Forest Moss
- 1 18" Straw Wreath
- Hot Glue Gun & Hot Glue
- Vacuum A must for this project!
Instructions
- Clear a large area like a kitchen counter or island to place your wreath & moss on to create your DIY moss wreath.
- Place the different mosses in piles so that you can easily grab them when making the wreath.
- Place the straw wreath curved side up on the counter (the flat side of the wreath is the backside so it sits flush against the wall or door).
- Select any one of the mosses and begin gluing it to the straw wreath. I found that adding the glue to the backside of the moss was the best way to attach it to the wreath. Moss easily breaks into small chunks, making it very easy to work with and glue to the wreath.
- Add the moss in about 4" sections to the wreath. Adding the moss to the wreath will resemble a jigsaw puzzle. You will want to piece the chunks of moss together just like a puzzle.
- Make sure to cover the front & sides of the wreath base so no straw is showing. You do not need to add moss to the back of the wreath.
- Continue adding moss around the wreath in 4" sections. I alternated forest moss & reindeer moss, and alternated the colors of the different mosses as well.
- Now, you may need to vacuum your counter & floors a couple of times while adding the moss to the wreath. The moss will lose pieces along with dirt, so the counter can get very dirty.
- Add moss to the entire wreath until the straw wreath is no longer visible.
- Once the straw wreath is covered with moss, your moss wreath is complete!
- Hang it from a hook, on a wall, or from a door for beautiful, organic spring decor.
Notes
- Your moss wreath will shed (not nearly as much as when you were making it) so you can seal it to prevent further shedding. I did not do this step but you could use an acrylic sealing spray, a fabric stiffening spray, or hairspray would work too.
- Clear a large, flat work space to make this wreath. You will have plenty of room to spread out the moss and will have a space you don’t mind getting dirty.
- Keep a vacuum on hand for this wreath project. Moss can be messy and a quick vacuum between moss sections will help to keep your space clean.
- Alternate the different moss varieties & colors to create a wreath that is chunky and visually appealing.
- Add a bow or other embellishments for more character & whimsy.
Did you enjoy this post? PIN it for later!


Thank you so much Kim!
Your wreath turned out so pretty! What a great dupe!
Thank you so much!
This turned out beautiful! I made a moss wreath a few years ago but I love you mixed the colors so beautifully.
Thank you Janine! It was fun to make this wreath, messy but fun!
Thank you Melanie!
Thank you Renae!
Thank you! It was messy to make, but I love the result!
Thank you Annie! This was a fun wreath to create!
Heidi,
I adore your gorgeous moss wreath! You incorporated so many cool varieties.
OBSESSED with all the different neutral colors of moss you used! Pinned!
Your wreath is so beautiful! I love it!
Love this, Heidi! So pretty how you used different kinds of moss.
I love your earthy moss wreath! Perfect for any season, really….but it looks so beautiful in your home in spring. Pinned to remind myself to make one!